React Hooks Documentation: An Easy to Read Version

React hooks were added to React in version 16.8. With the transition from class to functional components, hooks let you use state and other features within functional components i.e without writing a class component.
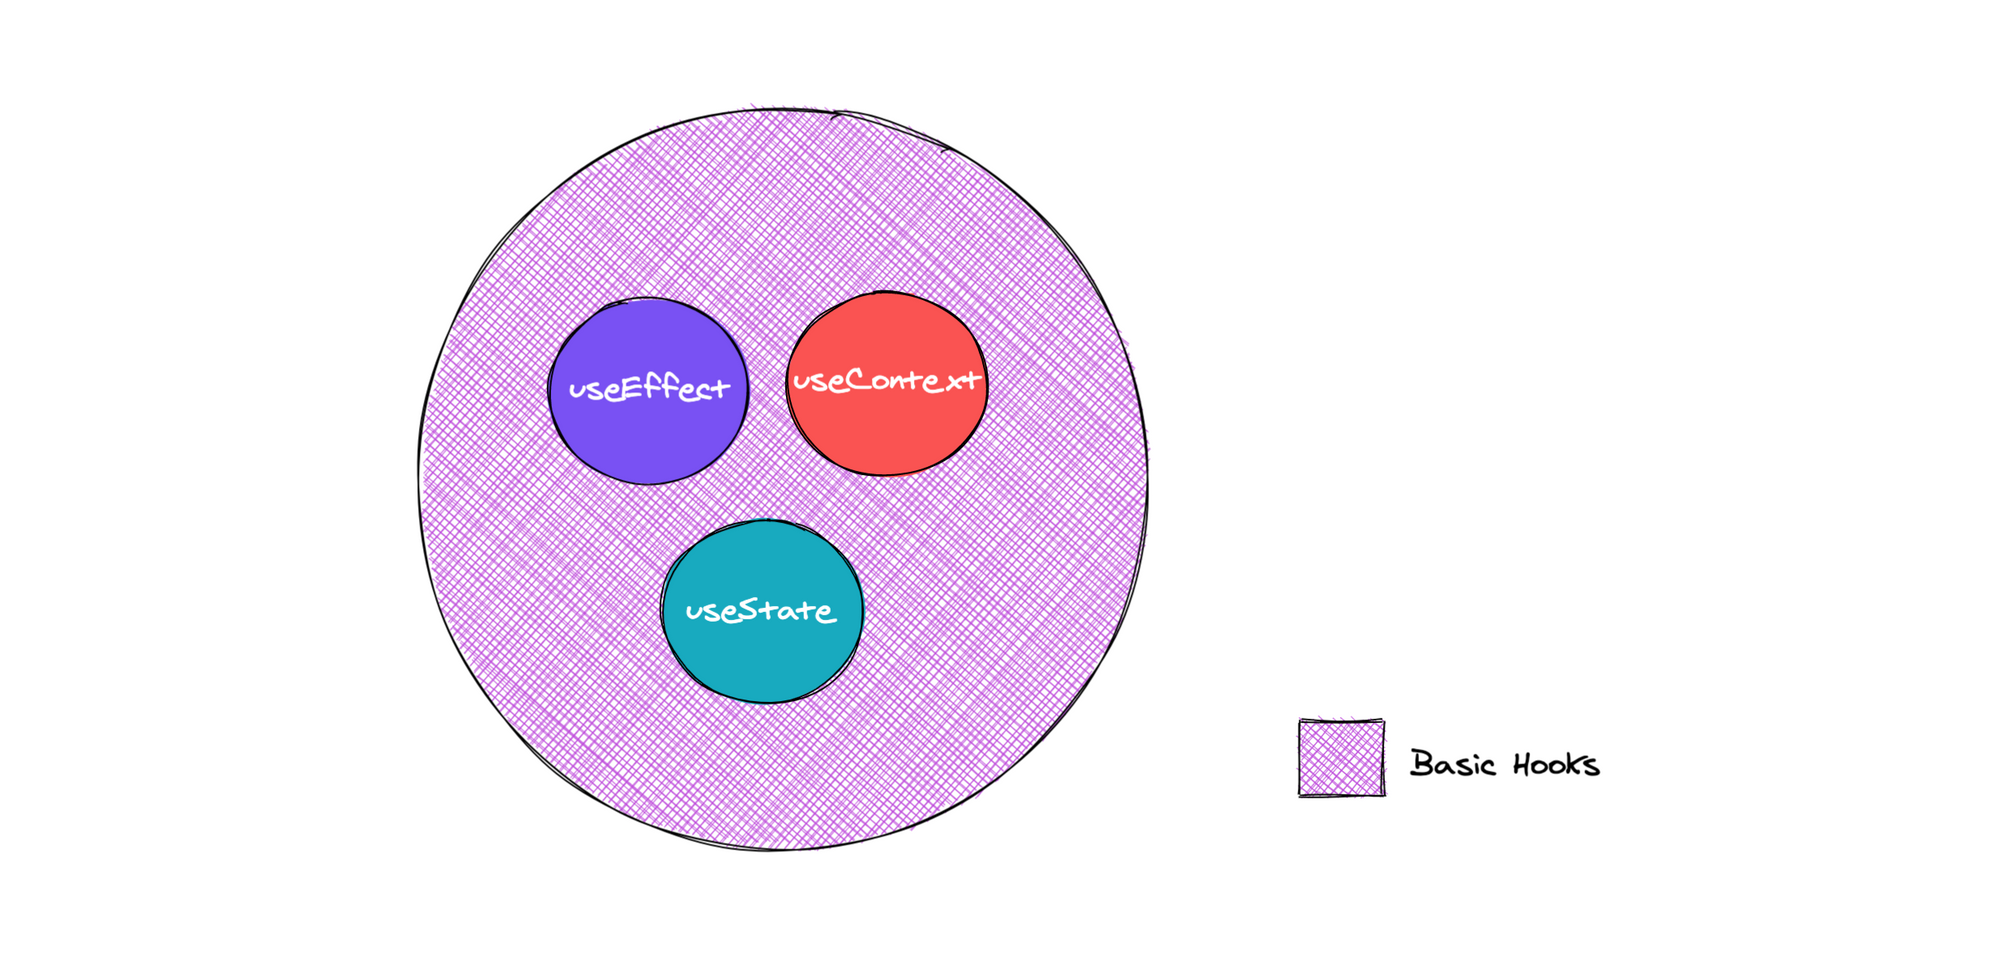
This reference guide will discuss all the hooks natively available in React, but first, let’s start with the basic React hooks: useState, useEffect and useContext
useState
The signature for the useState is as follows:
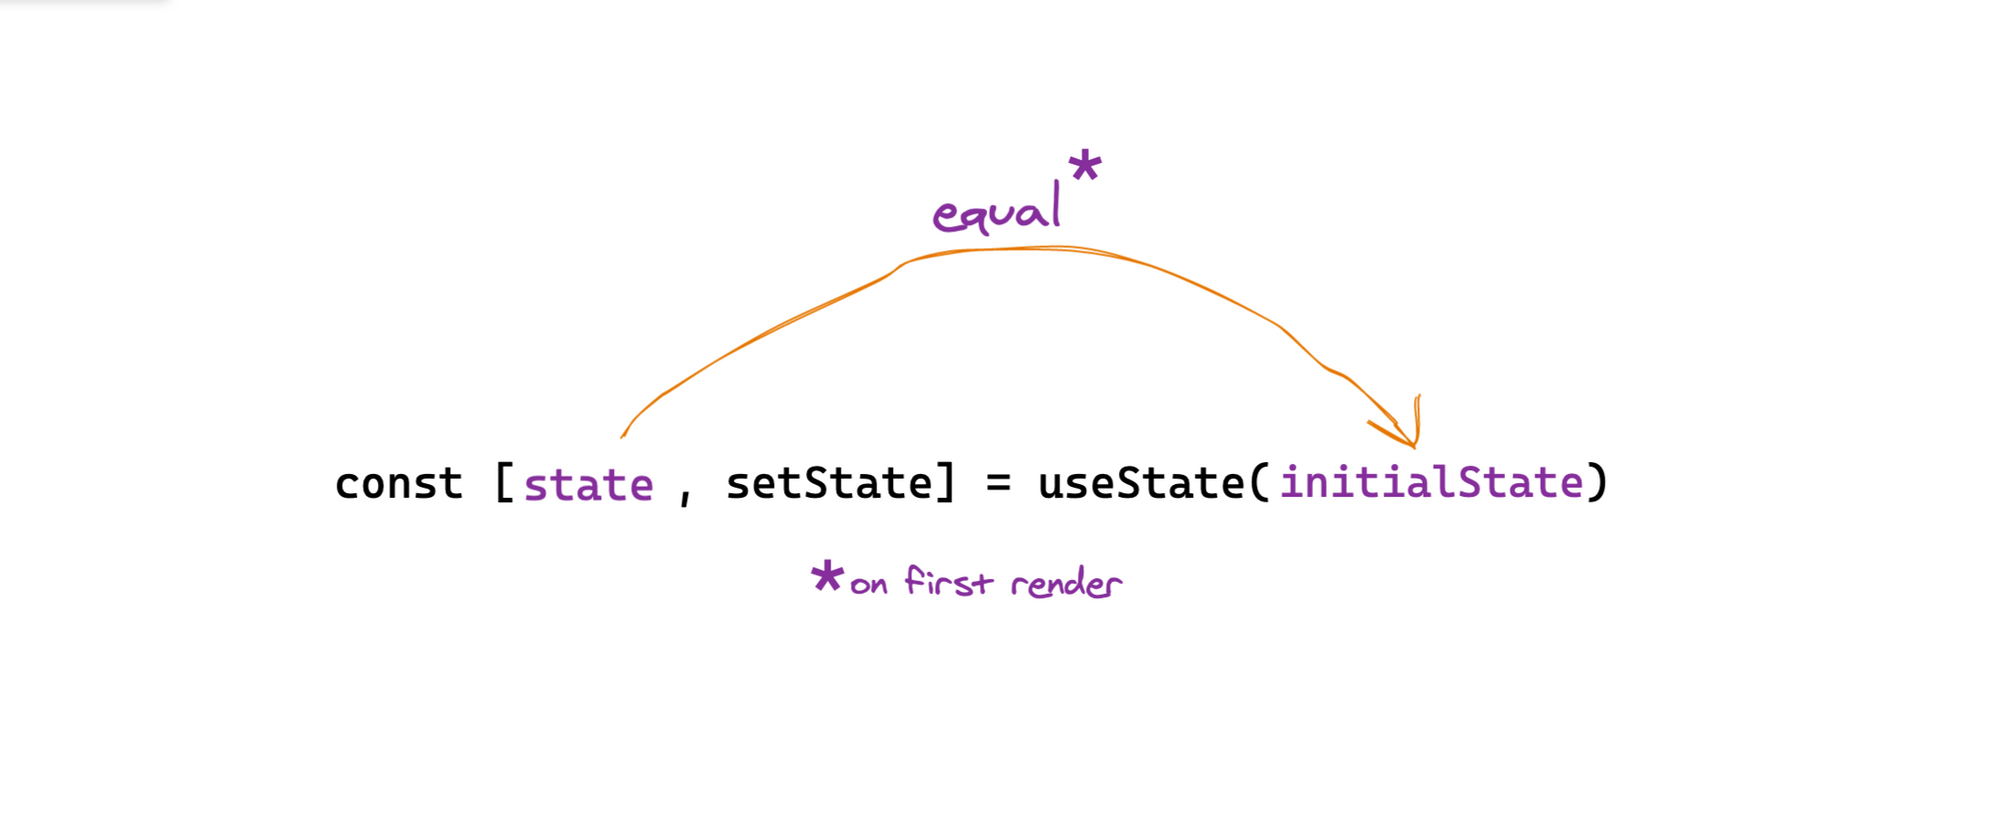
const [state, setState] = useState(initialState);
where state and setState refer to the state value and updater function returned on invoking useState with some initialState
It’s important to note that when your component first renders and invokes useState, the initialState is the returned state from useState .
Also, to update state, the state updater function setState should be invoked with a new state value as shown below:
setState(newValue)
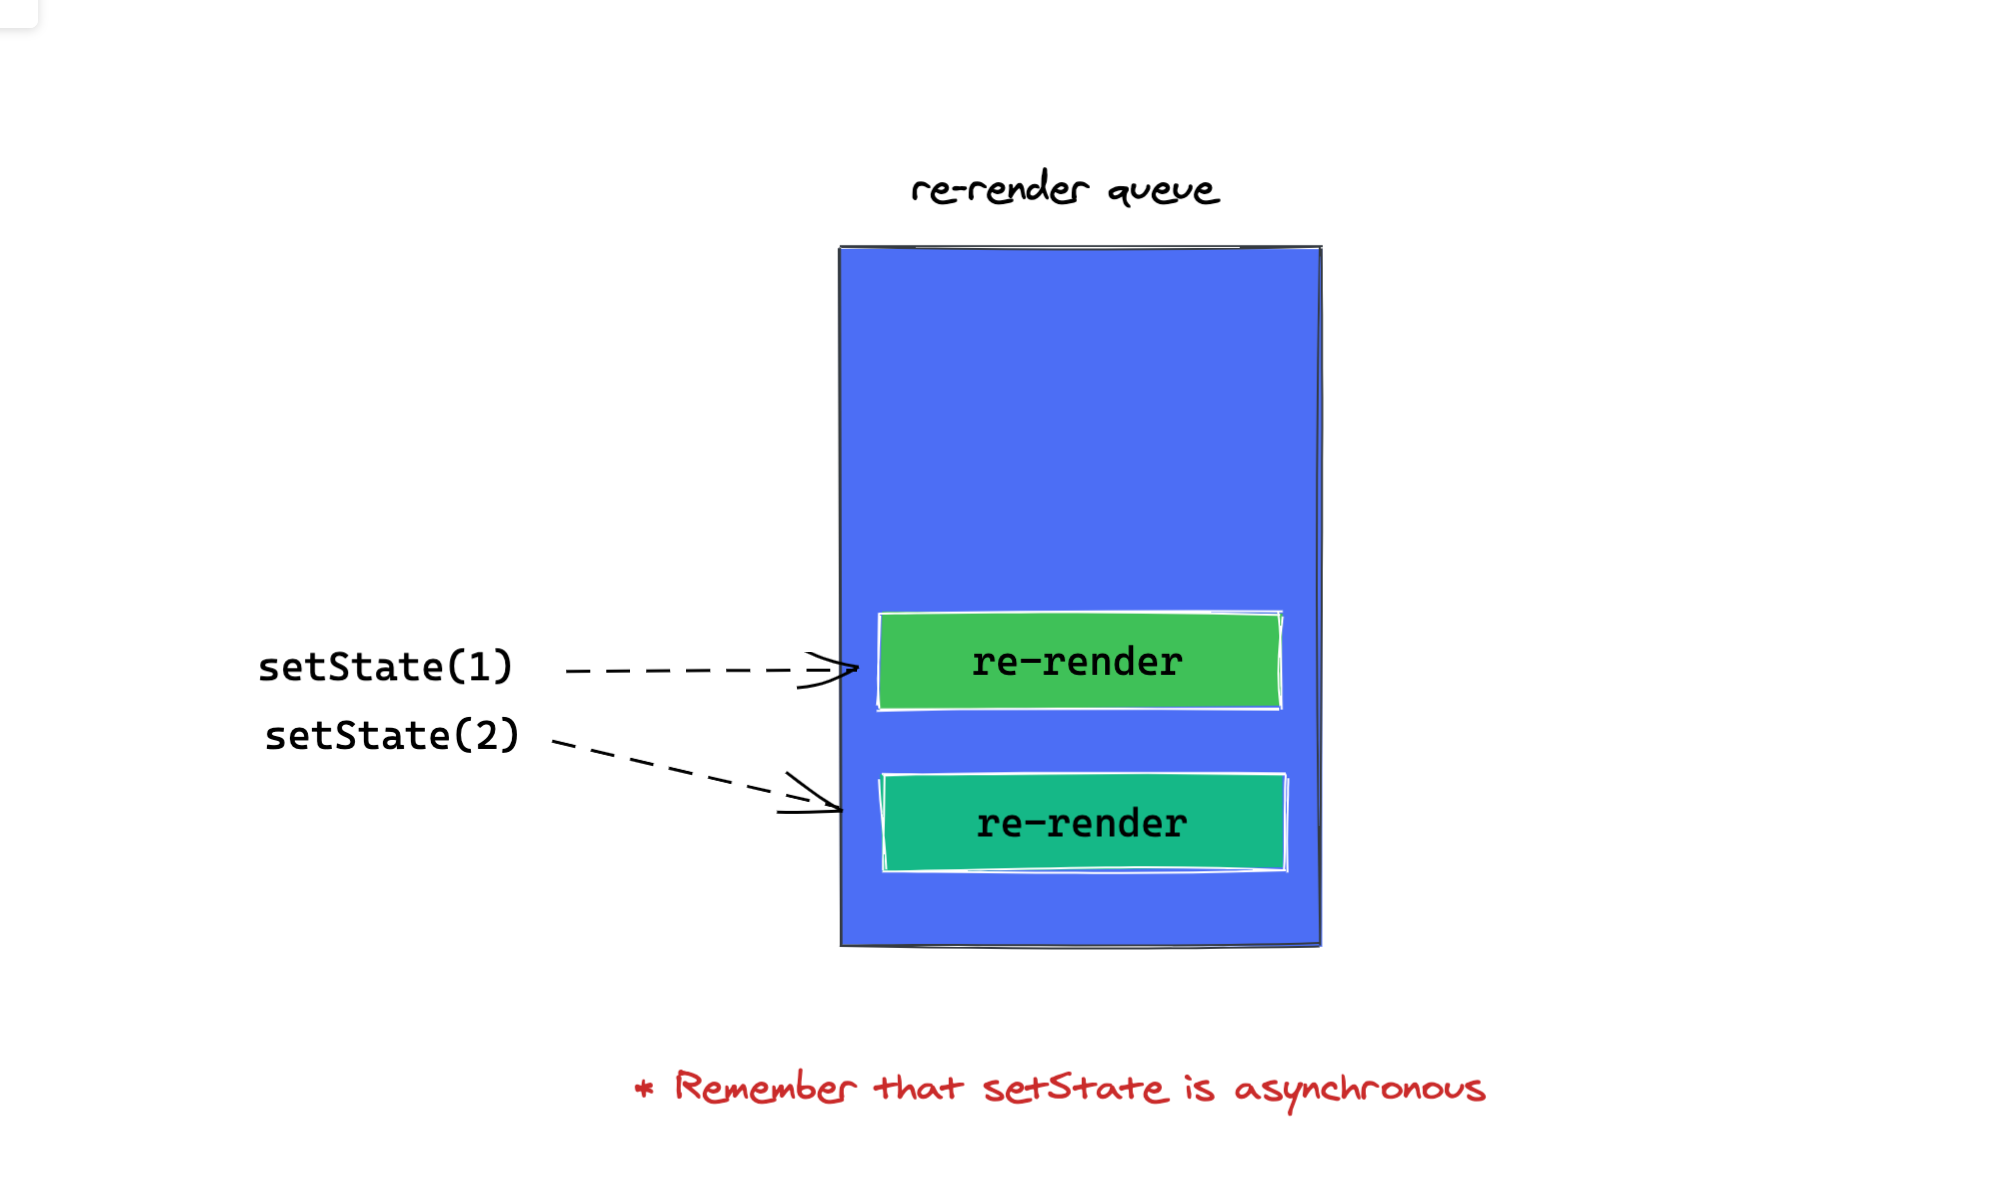
By doing this a new re-render of the component is queued. useState guarantees that the state value will always be the most recent after applying updates.
For referential checks, the setState function’s reference never changes during re-renders. Why is this important? It’s completely okay to have the updater function in the dependency list of other hooks such as useEffect and useCallback as seen below:
useEffect(() => {
	setState(5)
}, [setState]) //setState doesn't change, so useEffect is only called on mount.
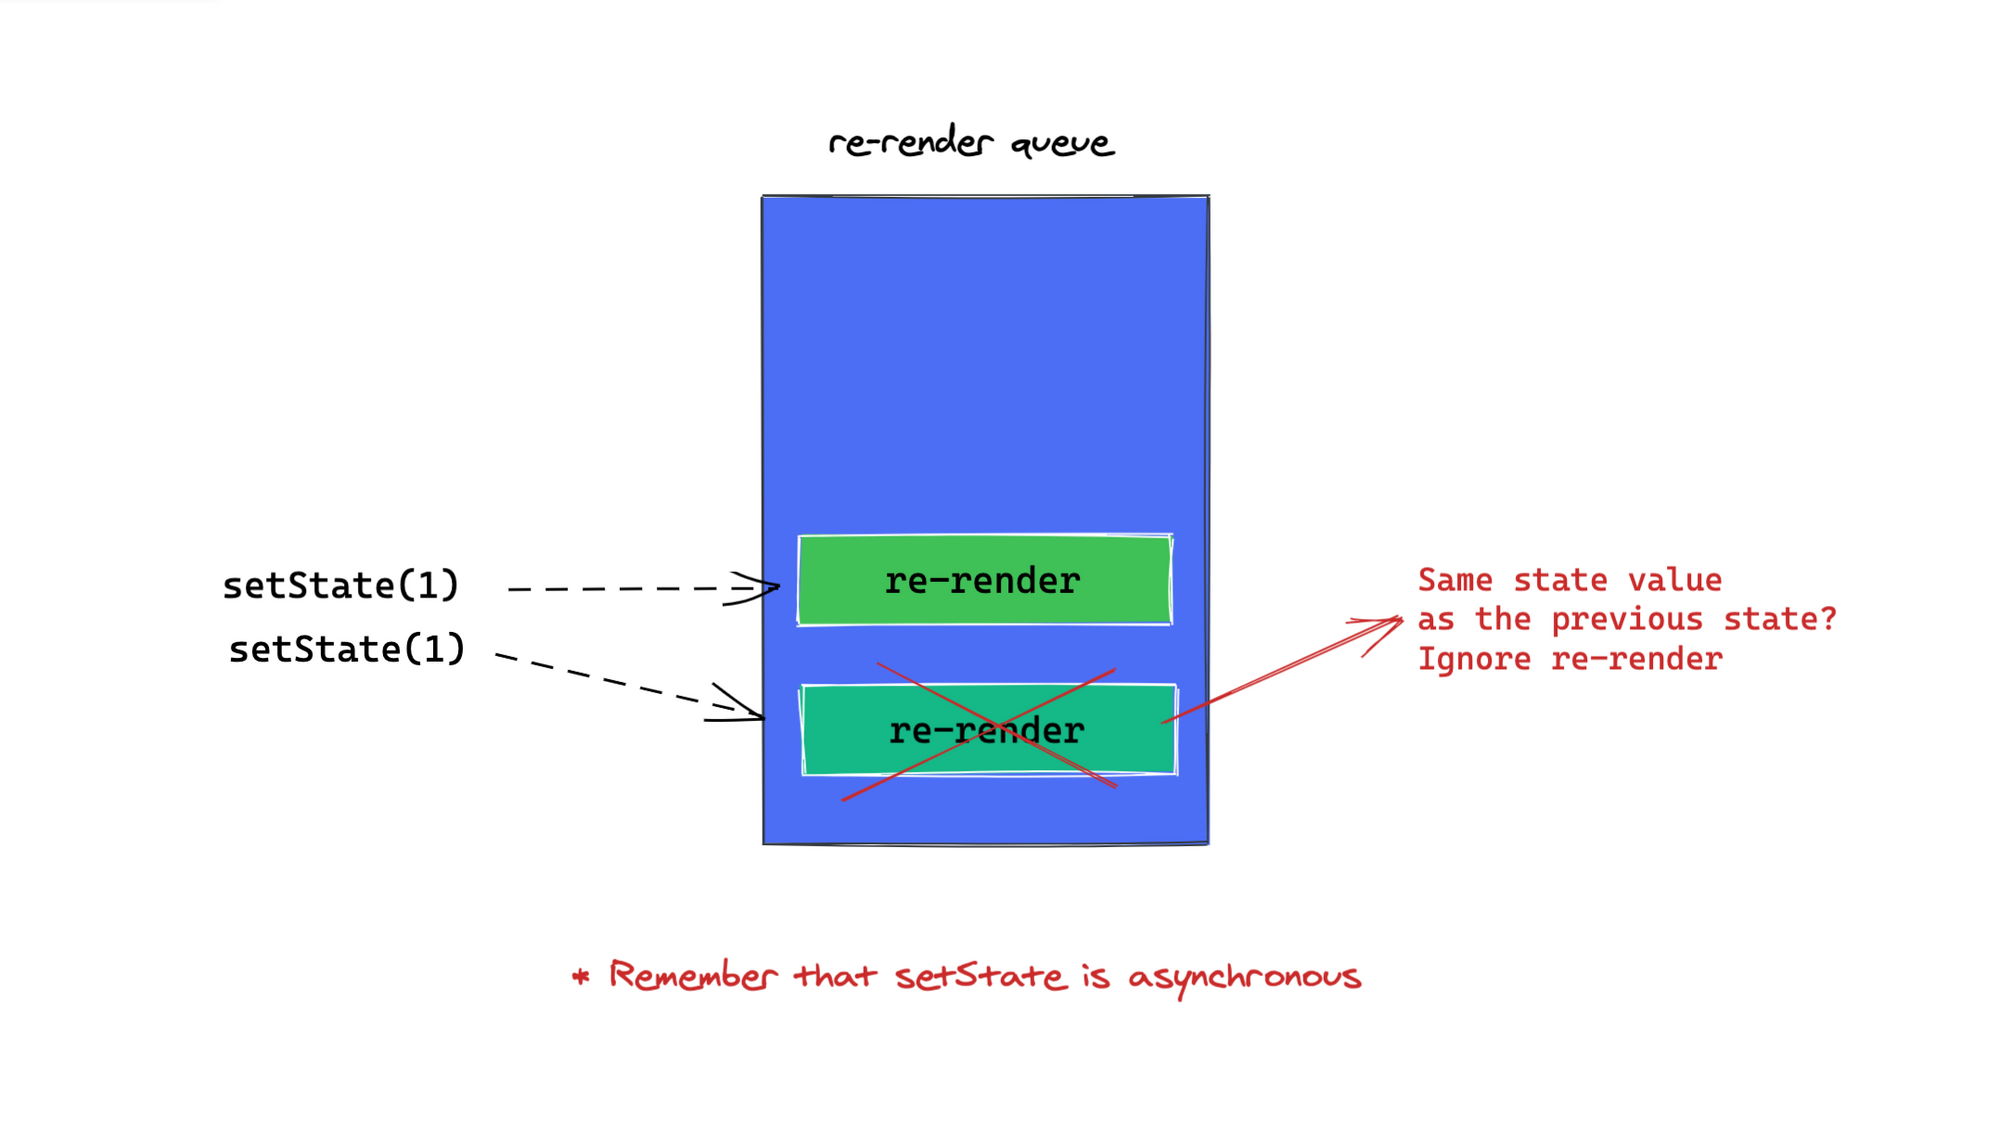
Note that if the updater function returns the exact same value as the current state, the subsequent re-render is skipped
Functional Updates
The state updater function returned by useState can be invoked in two ways. The first is by passing a new value directly as an argument:
const [state, setState] = useState(initialStateValue)

// update state as follows
setState(newStateValue)
This is correct and works perfectly in most cases. However, there are cases where a different form of state update is preferred: functional updates.
See the example above revised to use the functional update form:
const [state, setState] = useState(initialStateValue)

// update state as follows
setState((previousStateValue) => newValue)
You pass a function argument to setState. Internally, React will invoke this function with the previous state as an argument. Whatever is returned from this function is set as the new state.
Let’s take a look at cases where this approach is preferred.
1. New state value depends on the previous state
When your new state depends on the previous state value e.g. a computation, favour the use of the functional state update. Since setState is async, React guarantees that the previous state value is accurate.
Here’s an example:
function GrowingButton() {
  const [width, setWidth] = useState(50);

  // call setWidth with functional update
  const increaseWidth = () => setWidth((previousWidth) => previousWidth + 10);

  return (
    <button style={{ width }} onClick={increaseWidth}>
      I grow
    </button>
  );
}
In the example above, the button grows every time it’s clicked. Since the new state value depends on the old i.e, previousWudth + 10, the functional update form of setState is preferred.
2. Merging object state
Consider the following code block:
function CanYouFigureThisOut() {
   const [state, setState] = useState({ name: "React" });
  const updateState = () => setState({ creator: "Facebook" });
  return (
    <>
      <pre>{JSON.stringify(state)}</pre>
      <button onClick={updateState}>update state</button>
    </>
  );

}
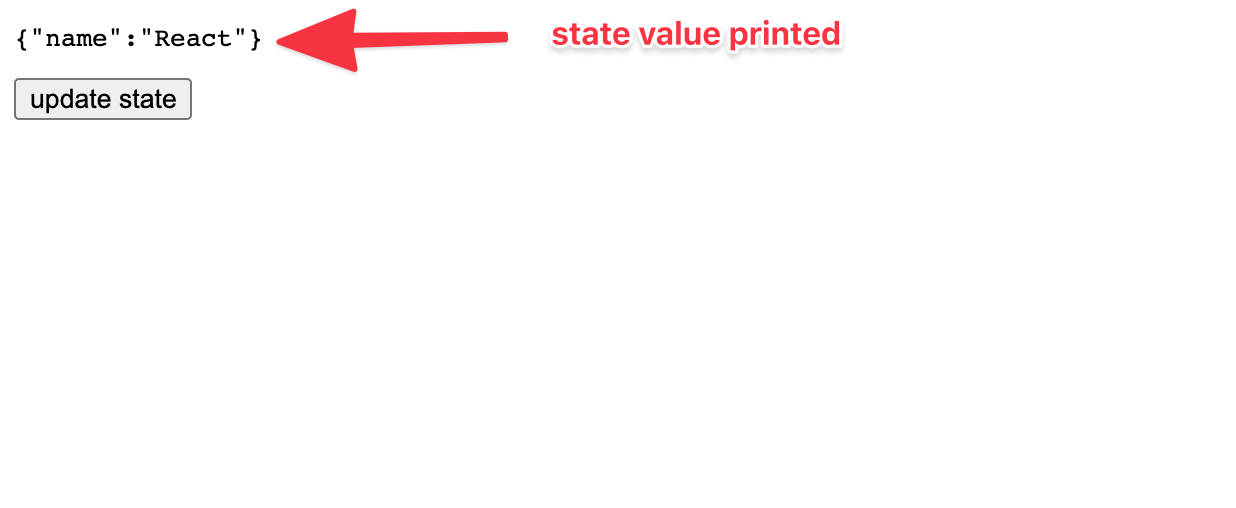
When you click the update state button, which of these state values is printed:
//1.
{"name": "React", "creator": "Facebook"}

//2.
{"creator": "Facebook"}

//3.
{"name": "React"}
The correct answer is 2, and this is because unlike the setState function in class components, with hooks the updater function does NOT merge objects. It replaces the state value with whatever new value is passed as an argument.
Here’s how to fix that using the functional update form of the state updater function.
const updateState = () => setState((prevState) => ({ ...prevState, creator: "Facebook" }));
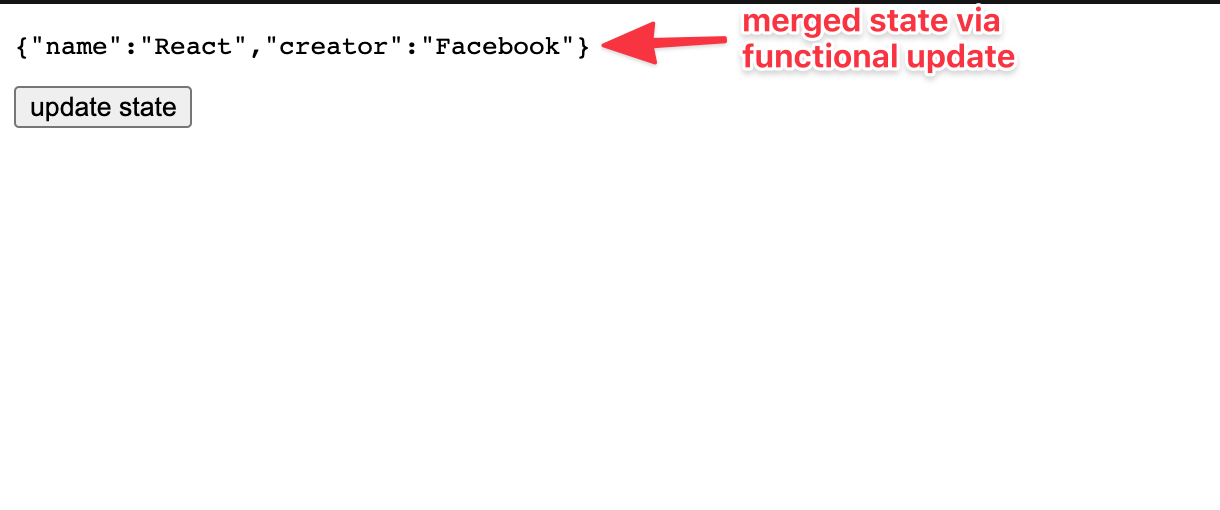
Pass a function to setState and return a merged object by using the spread operator (Object.assign also works).
3. Avoiding state dependency in other hooks
There are legitimate cases where you may include a state value as a dependency to useEffect or useCallback . However, if you’re getting needless fires from your useEffectcallback owing to a state dependency used by setState, the updater form can eradicate the need for that.
See example below:
const [state, setState] = useState(0)

// before
useEffect(() => {
  setState(state * 10)
}, [state, setState]) //add dependencies to prevent eslint warning

// after: if your goal is to run the callback only on mount
useEffect(() => {
  setState(prevState => prevState * 10)
}, [setState]) //remove state dependency. setState can be safely used here.
Lazily Initialising State
The initialState argument to useState is only used during your initial render.
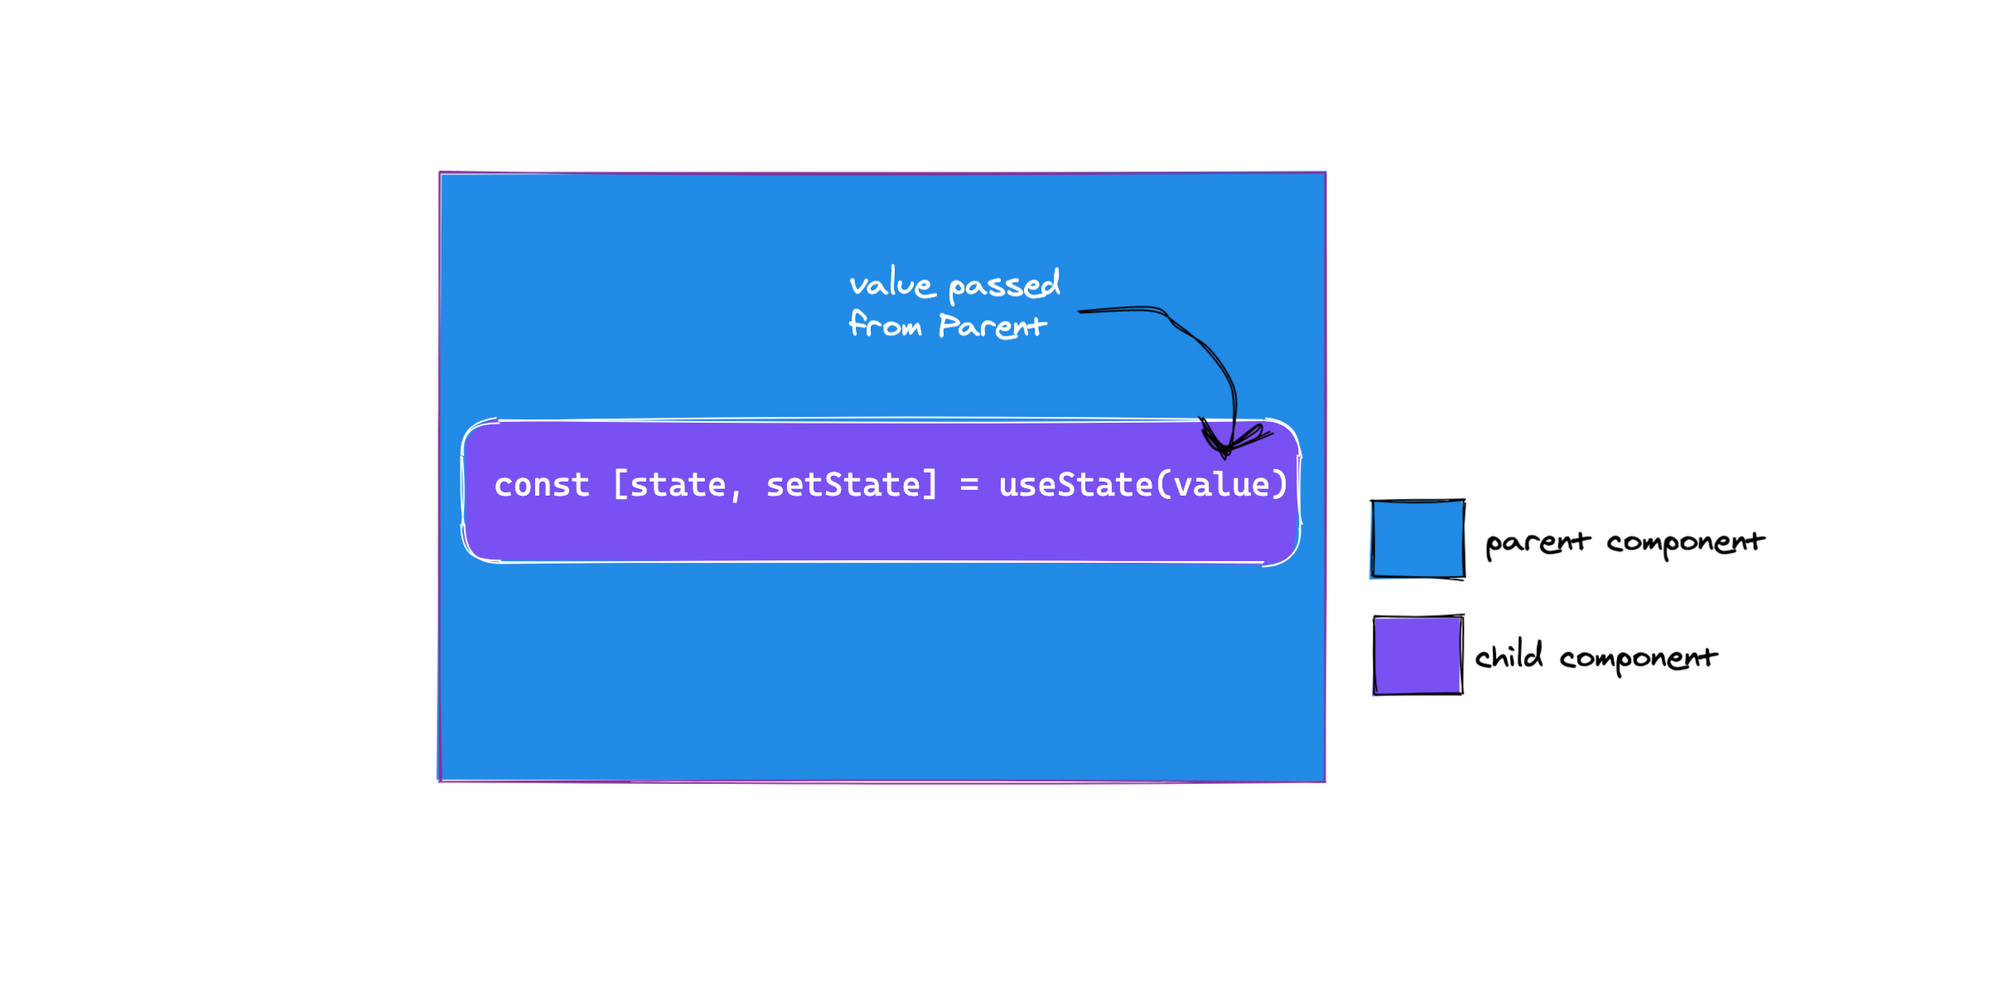
// this is okay
const [state, setState] = useState(10)

// subsequent prop updates are ignored
const App = ({myProp}) => {
  const [state, setState] = useState(myProp)
}
// only the initial myProp value on initial render is passed as initialState. subsequent updates are ignored.
However, if the initial state is a result of an expensive computation, you could also pass a function which will only be invoked only on initial render:
const [state, setState] = useState(() => yourExpensiveComputation(props))
Bailing out of a state update
If you try to update state with the same value as the current state, React won’t render the component children or fire effects e.g. useEffect callbacks. React compares previous and current state via the Object.is comparison algorithm, if they are equal it ignores the re-render.
it’s important to note that in some cases, React may still render the specific component whose state was updated. That’s okay because React will not go deeper into the tree i.e render the component’s children.
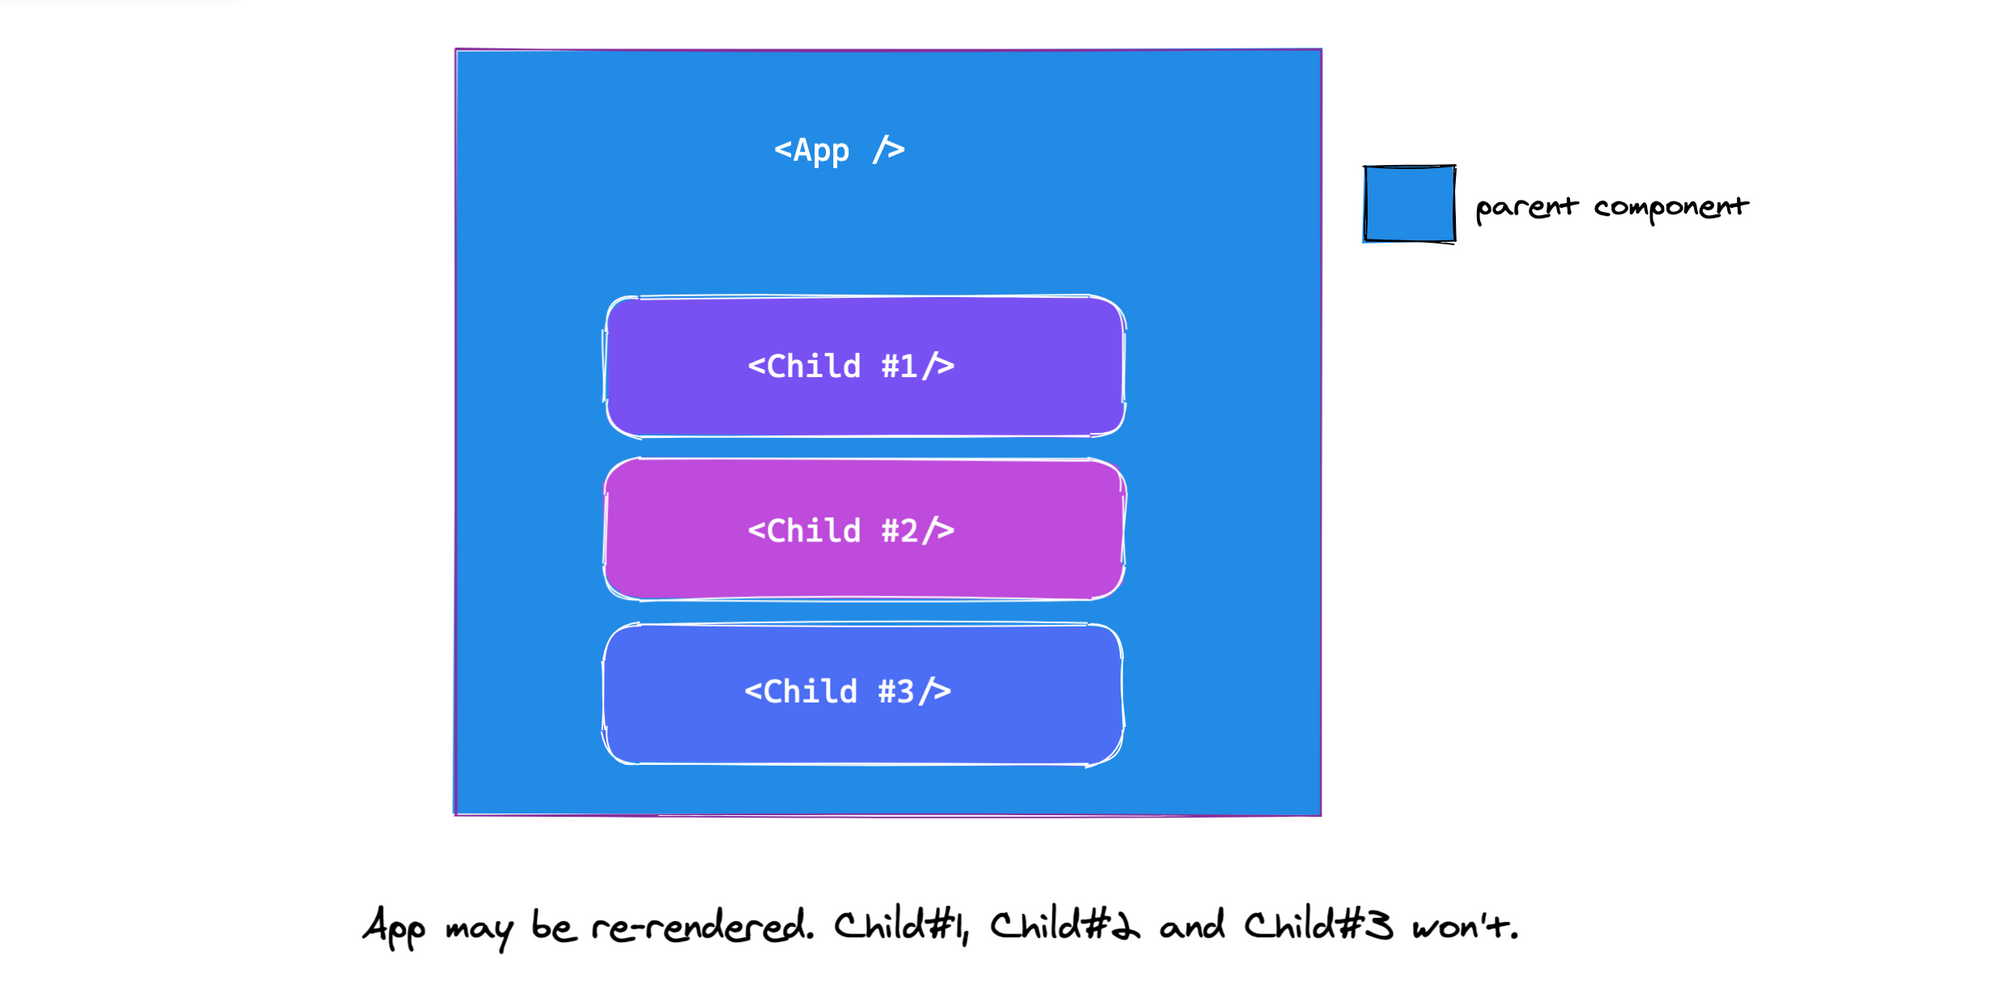
If expensive calculations are done within the body of your functional component i.e before the return statement, consider optimising these with useMemo
useEffect
The basic signature of useEffect is as follows:
useEffect(() => {

})
useEffect accepts a function that ideally contains some imperative, possibly effectual code. Examples of this include mutations, subscriptions, timers, loggers etc. Essentially, side effects that aren’t allowed inside the main body of your function component.
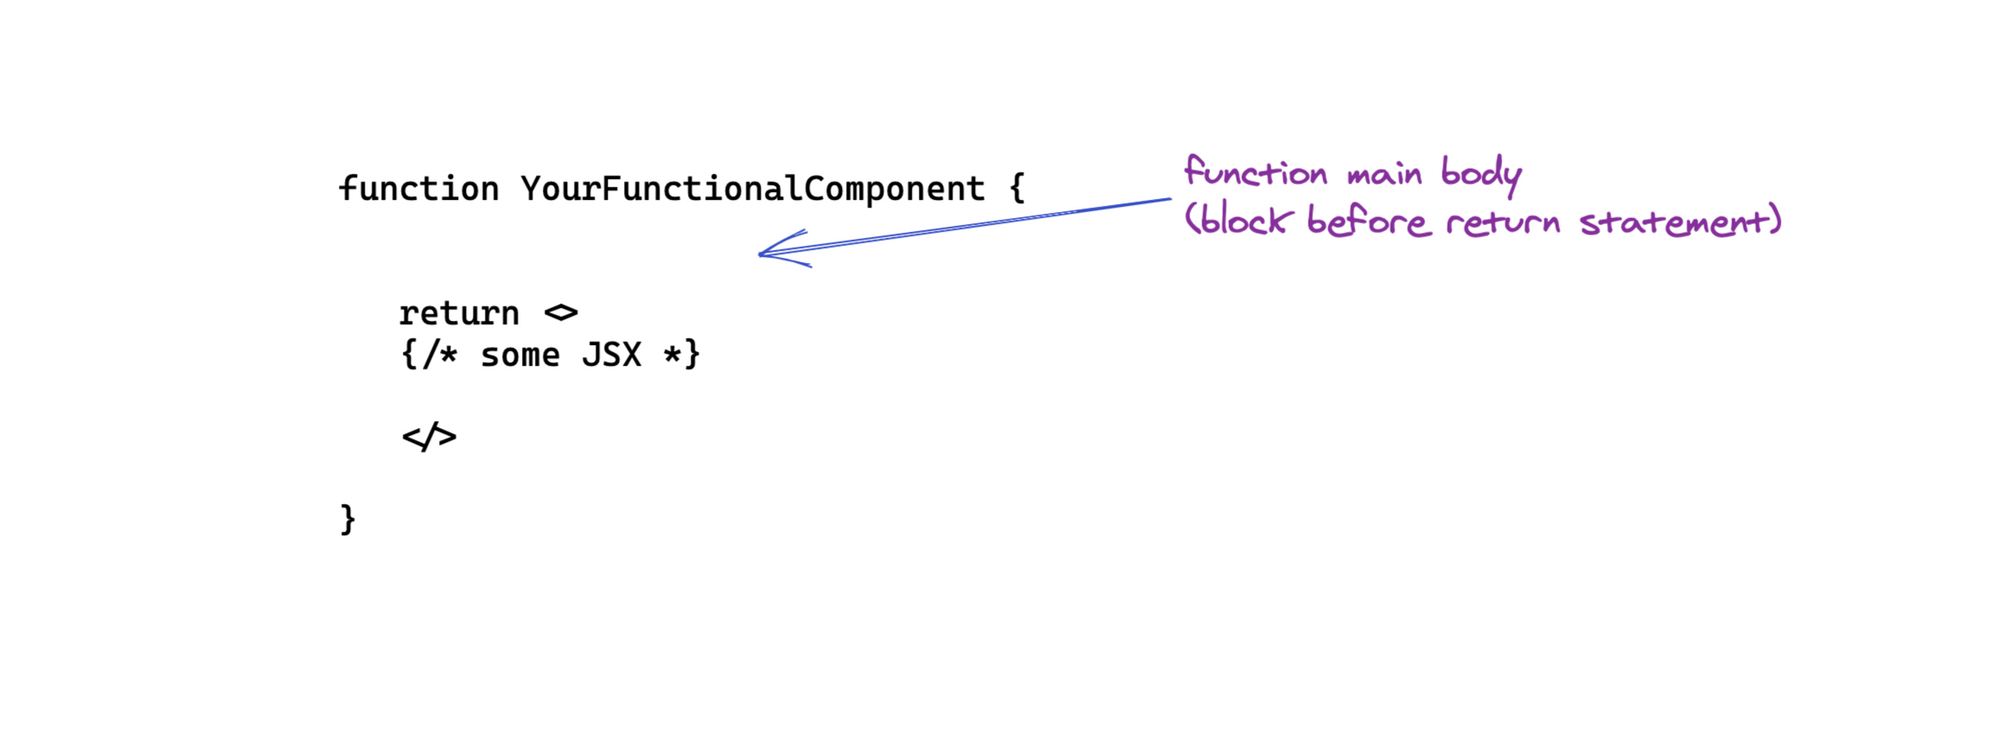
Having such side effects in the main body of your function can lead to confusing bugs and inconsistent UIs. Don’t do this. Use useEffect.
The function you pass to useEffect is invoked after the render is committed to the screen. I’ll explain what this means in a later section. For now, think of the callback as the perfect location to place imperative code within your functional component.
By default, the useEffect callback is invoked after every completed render, but you can choose to have this callback invoked only when certain values have changed - as discussed in a later section.
useEffect(() => {
  // this callback will be invoked after every render
})
Cleaning up an effect
Some imperative code need to be cleaned up e.g. to prevent memory leaks. For example, subscriptions need to be cleaned up, timers need to be invalidated etc. To do this return a function from the callback passed to useEffect:
useEffect(() => {
  const subscription = props.apiSubscripton()

  return () => {
     // clean up the subscription
     subscription.unsubscribeApi()
   }
})
The clean-up function is guaranteed to be invoked before the component is removed from the user interface.
What about cases where a component is rendered multiple times e.g. a certain component A renders twice? In this case, on first render, the effect subscription is set up and cleaned before the second render. In the second render, a new subscription is set up.
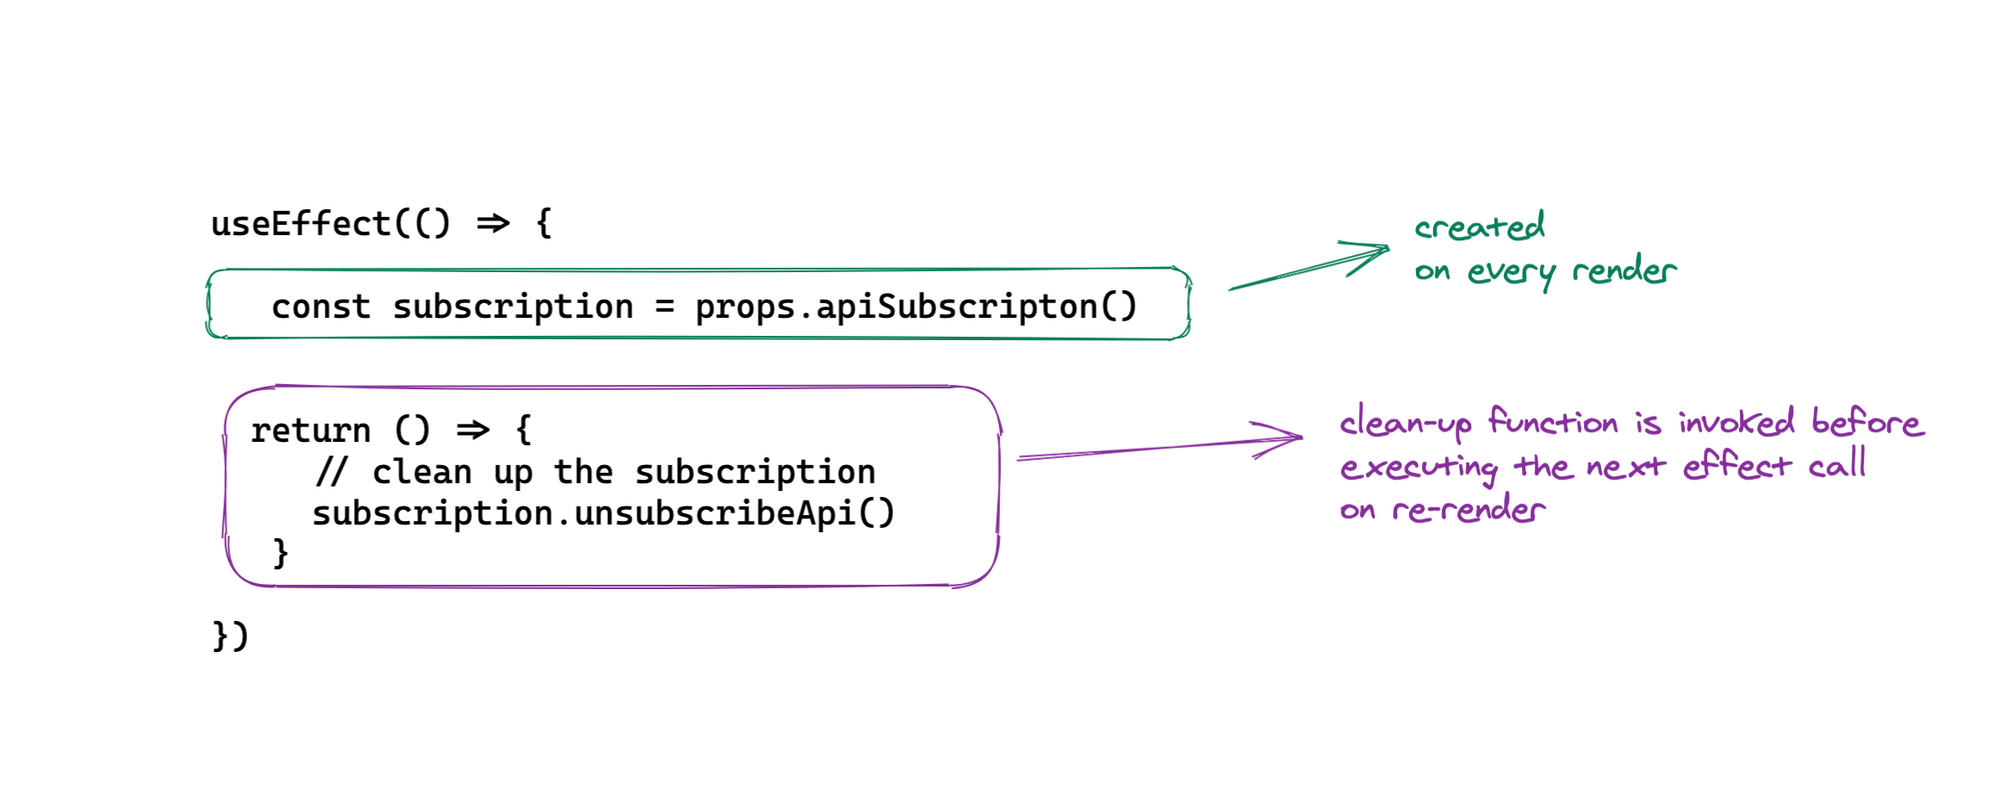
The implication of this is that a new subscription is created on every render. There are cases where you don’t want this to happen and you’d rather limit when the effect callback is invoked. Please refer to the next section for this.
Timing of an effect
There’s a very big difference between when the useEffect callback is invoked, and when class methods such as componentDidMount and componentDidUpdate are invoked.
The effect callback is invoked after the browser layout and painting are carried out. This makes it suitable for many common side effects such as setting up subscriptions and event handlers since most of these shouldn’t block the browser from updating the screen.

This is the case for useEffect, but this behaviour is not always ideal. What if you wanted a side effect to be visible to the user before the browser’s next paint? Sometimes this is important to prevent visual inconsistencies in the UI e..g with DOM mutations. For such cases, React provides another Hook called useLayoutEffect. It has the same signature as useEffect, the only difference is in when it’s fired i.e when the callback function is invoked.
NB: Although useEffect is deferred until the browser has painted, it is still guaranteed to be fired before any are renders. This is important.
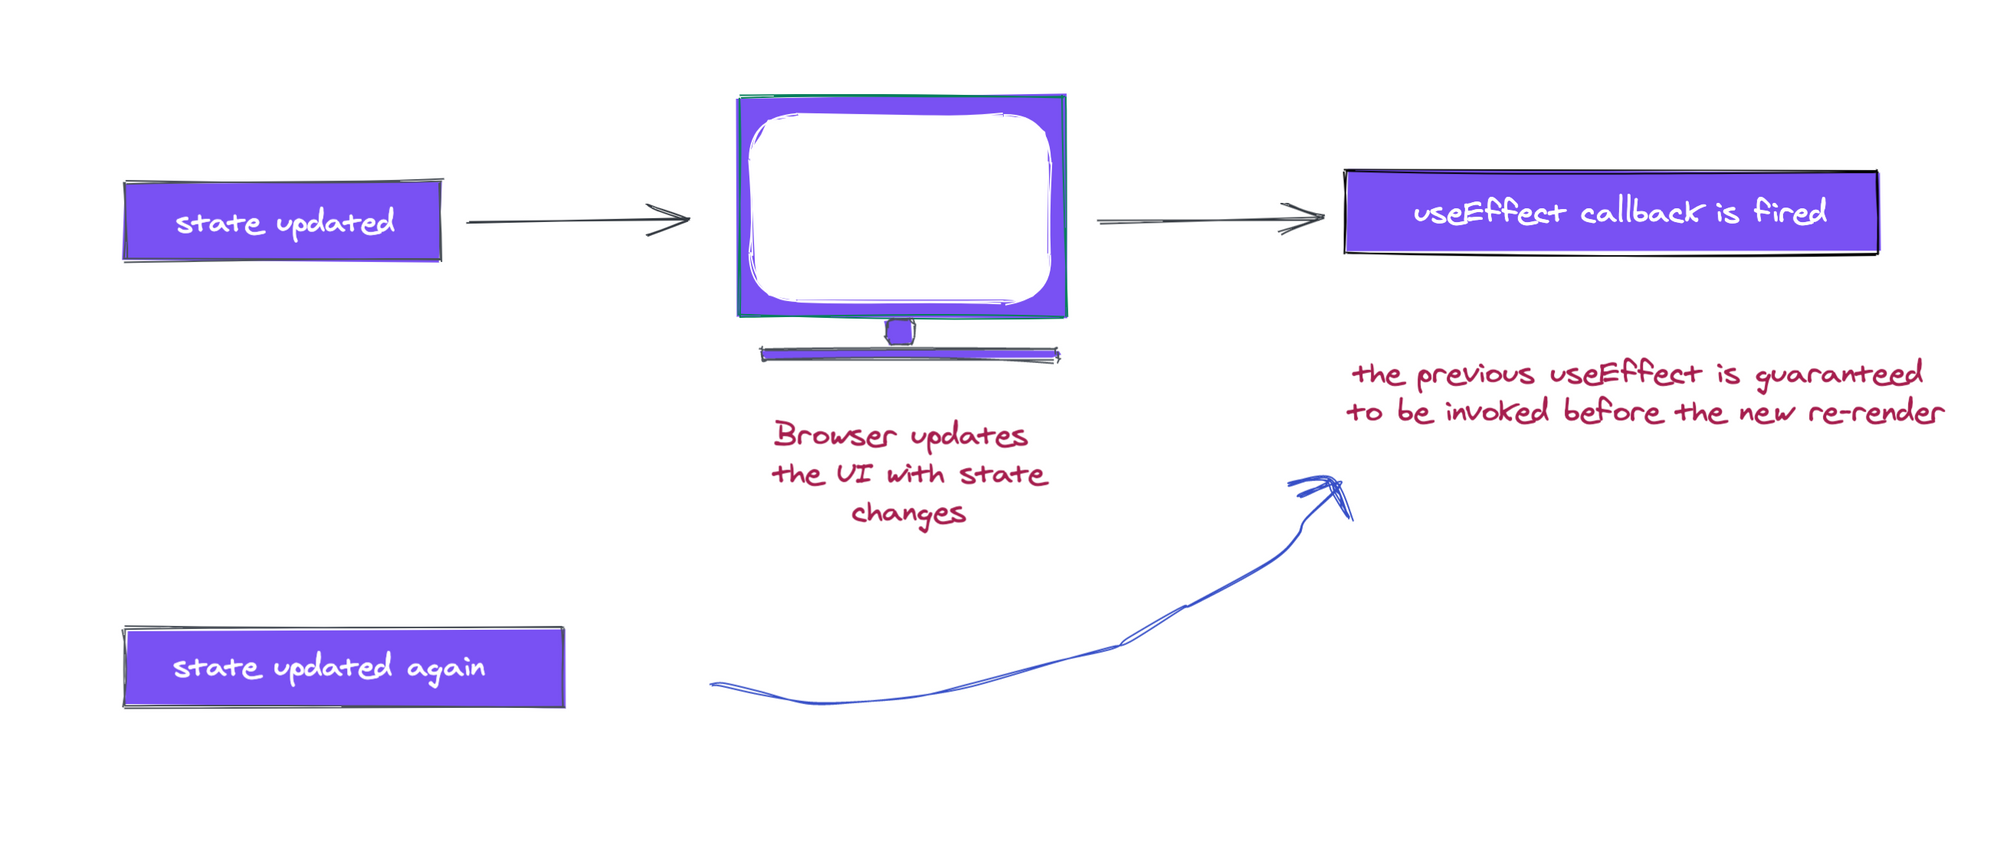
React will always flush a previous render’s effect before starting a new update.
Conditionally firing an effect
By default, the useEffect callback is invoked after every render.
useEffect(() => {
  // this is invoked after every render
})
This is done so that the effect is recreated if any of its dependencies change. This is great, but sometimes it’s an overkill.
Consider the example we had in an earlier section:
useEffect(() => {
   const subscription = props.apiSubscripton()

  return () => {
     // clean up the subscription
     subscription.unsubscribeApi()
   }
})
In this case, it doesn’t make a lot of sense to recreate the subscription every time a render happens. This should only be done when props.apiSubscripton changes.
To handle such cases, useEffect takes a second argument known as an array dependency.
useEffect(() => {

}, []) //note the array passed here
In the example above we can prevent the effect call from running on every render as follows:
useEffect(() => {
   const subscription = props.apiSubscripton()

  return () => {
     // clean up the subscription
     subscription.unsubscribeApi()
   }
}, [props.apiSubscripton]) // look here
Let’s take a close look at array dependency list.
If you want your effect to run only on mount (clean up when unmounted), pass an empty array dependency:
useEffect(() => {
   // effect callback will run on mount
   // clean up will run on unmount.
}, [])
If your effect depends on some state or prop value in scope, be sure to pass it as an array dependency to prevent stale values being accessed within the callback. If the referenced values change over time and are used in the callback, be sure to place them in the array dependency as seen below:
useEfect(() => {
  console.log(props1 + props2 + props3)
},[props1, props2, props3])
If you did this:
useEfect(() => {
  console.log(props1 + props2 + props3)
},[])
props1, props2 andprops3 will only have their initial values and the effect callback won’t be invoked when they change.
If you skipped one of them e.g. props3:
useEfect(() => {
  console.log(props1 + props2 + props3)
},[props1, props2])
Then the effect callback won’t run when props3 changes.
The React team recommends you use the eslint-plugin-react-hooks package. It warns when dependencies are specified incorrectly and suggests a fix.
You should also note that the useEffect callback will be run at least once. Here’s an example:
useEfect(() => {
  console.log(props1)
},[props1])
Assuming props1 is updated once i.e it changes from its initial value to another, how many times do you have props1 logged?
- Once: when the component mounts
- Once: when
props1changes - Twice: on mount and when
props1changes
The correct answer is 3; that’s because the effect callback is first fired after the initial render, and subsequent invocations happen when props1 changes. Remember this.
Finally, the dependency array isn’t passed as arguments to the effect function. It does seem like that though; that’s what the dependency array represents. In the future, the React team may have an advanced compiler that creates this array automatically. Until then make sure to add them yourself.
useContext
Here’s how the useContext hook is used:
const value = useContext(ContextObject)
Note that the value passed to useContext must be the context object i.e the return value from invoking React.createContext not ContextObject.Provider or ContextObject.Consumer
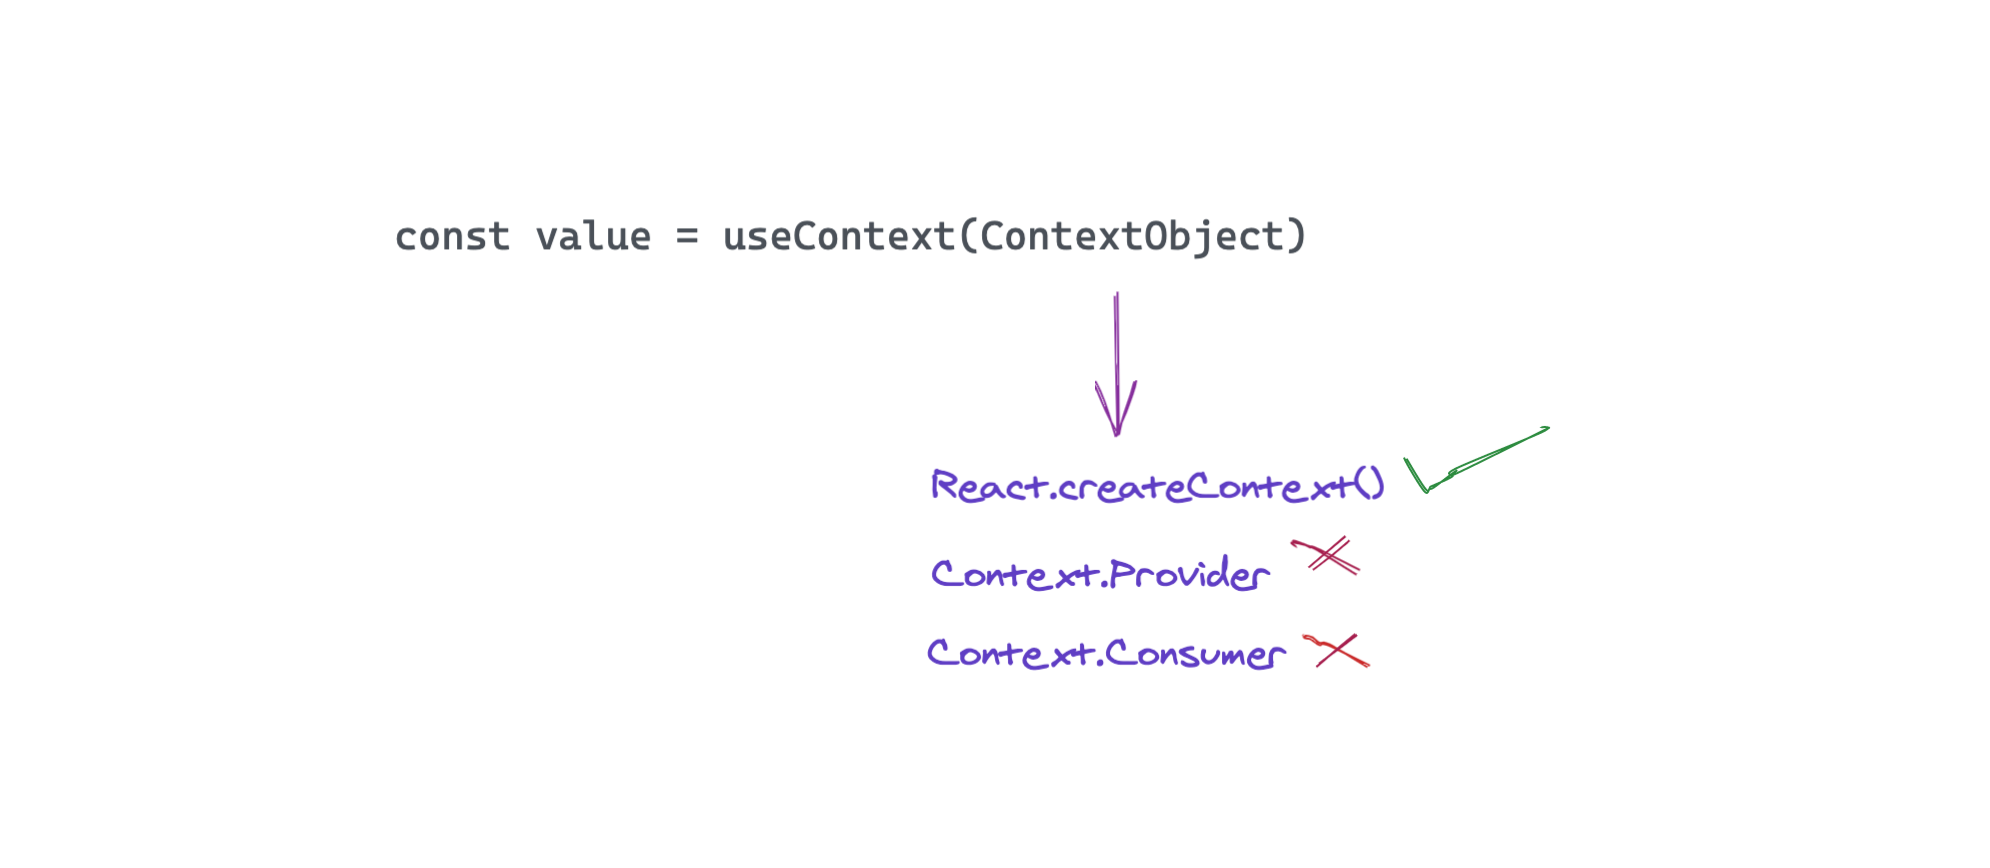
useContext is invoked with a context object (the result of calling React.createContext) and it returns the current value for that context.
The value returned from useContext is determined by the value prop of the nearest Provider above the calling component in the tree.
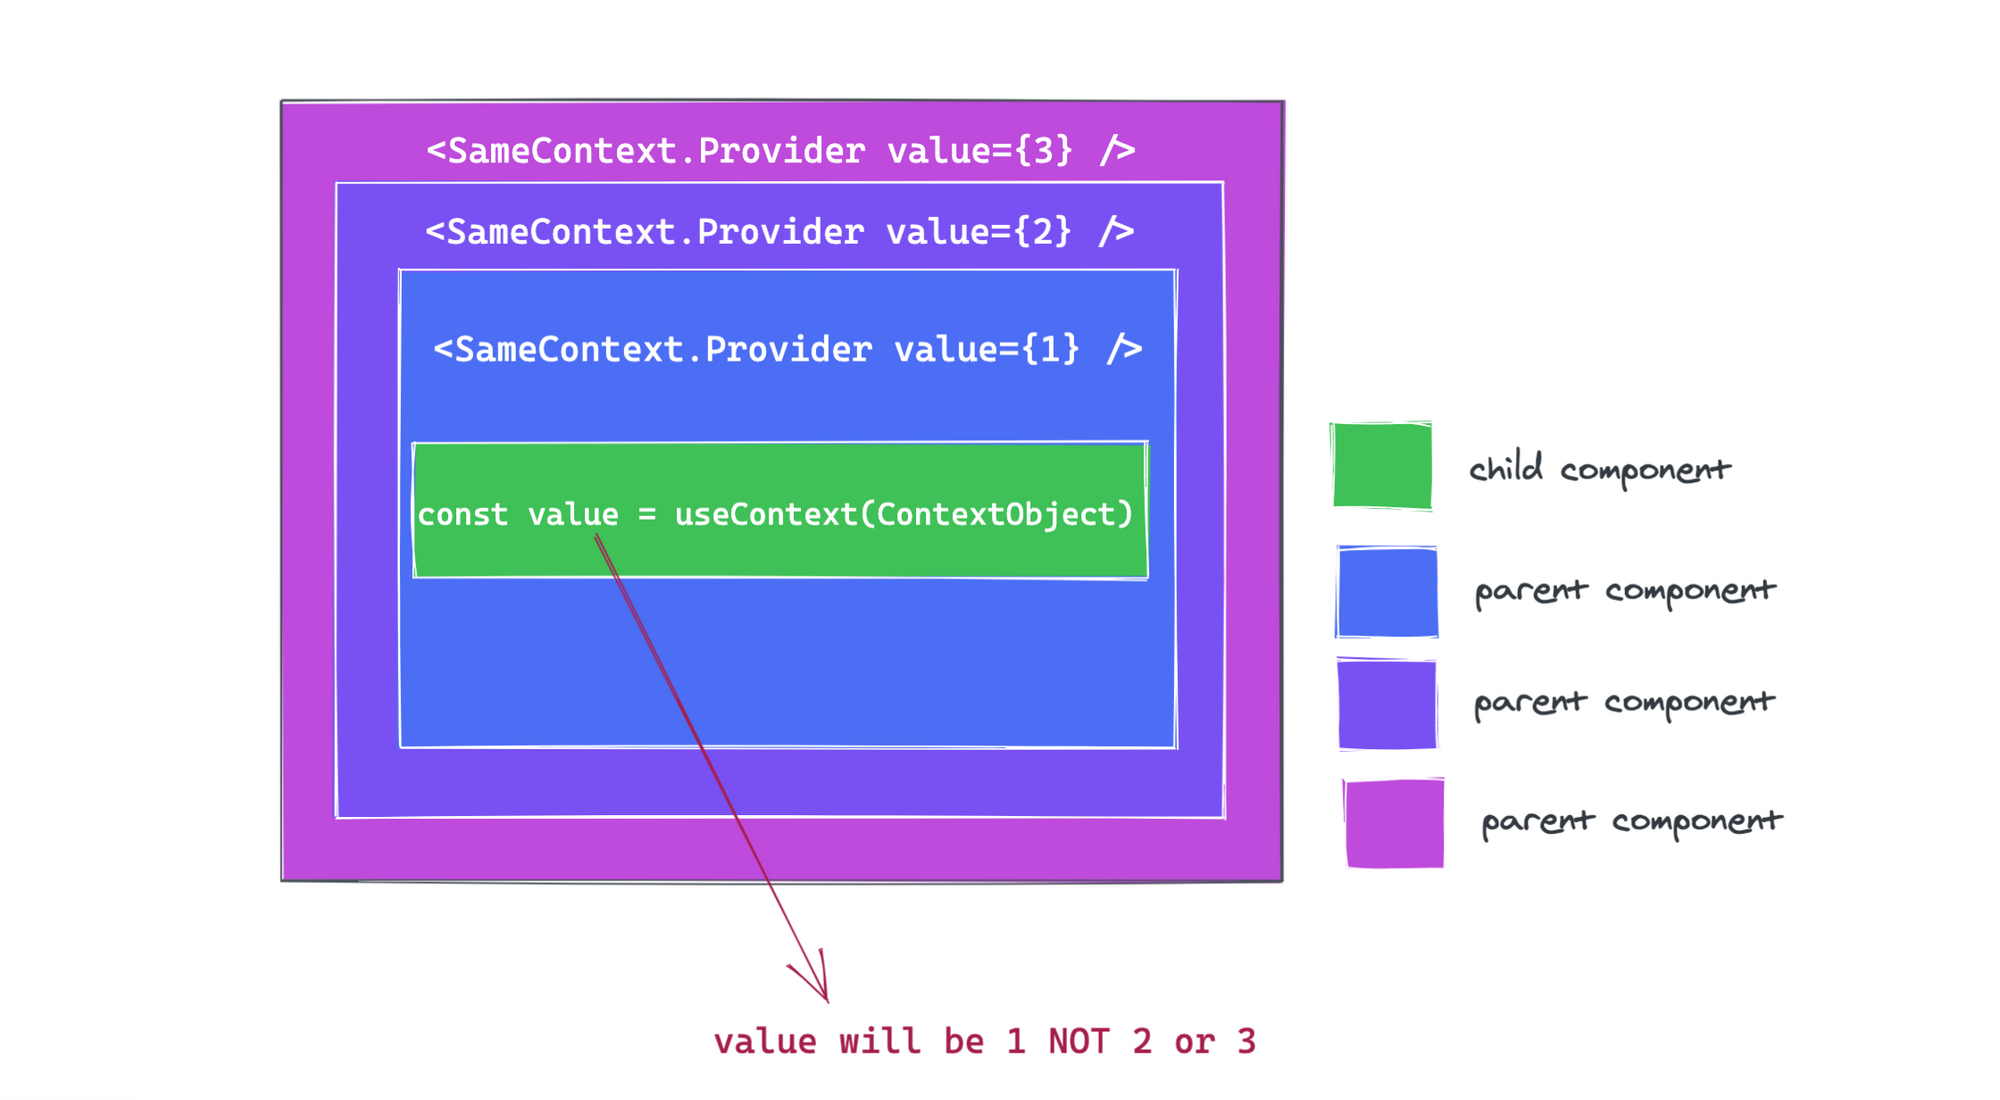
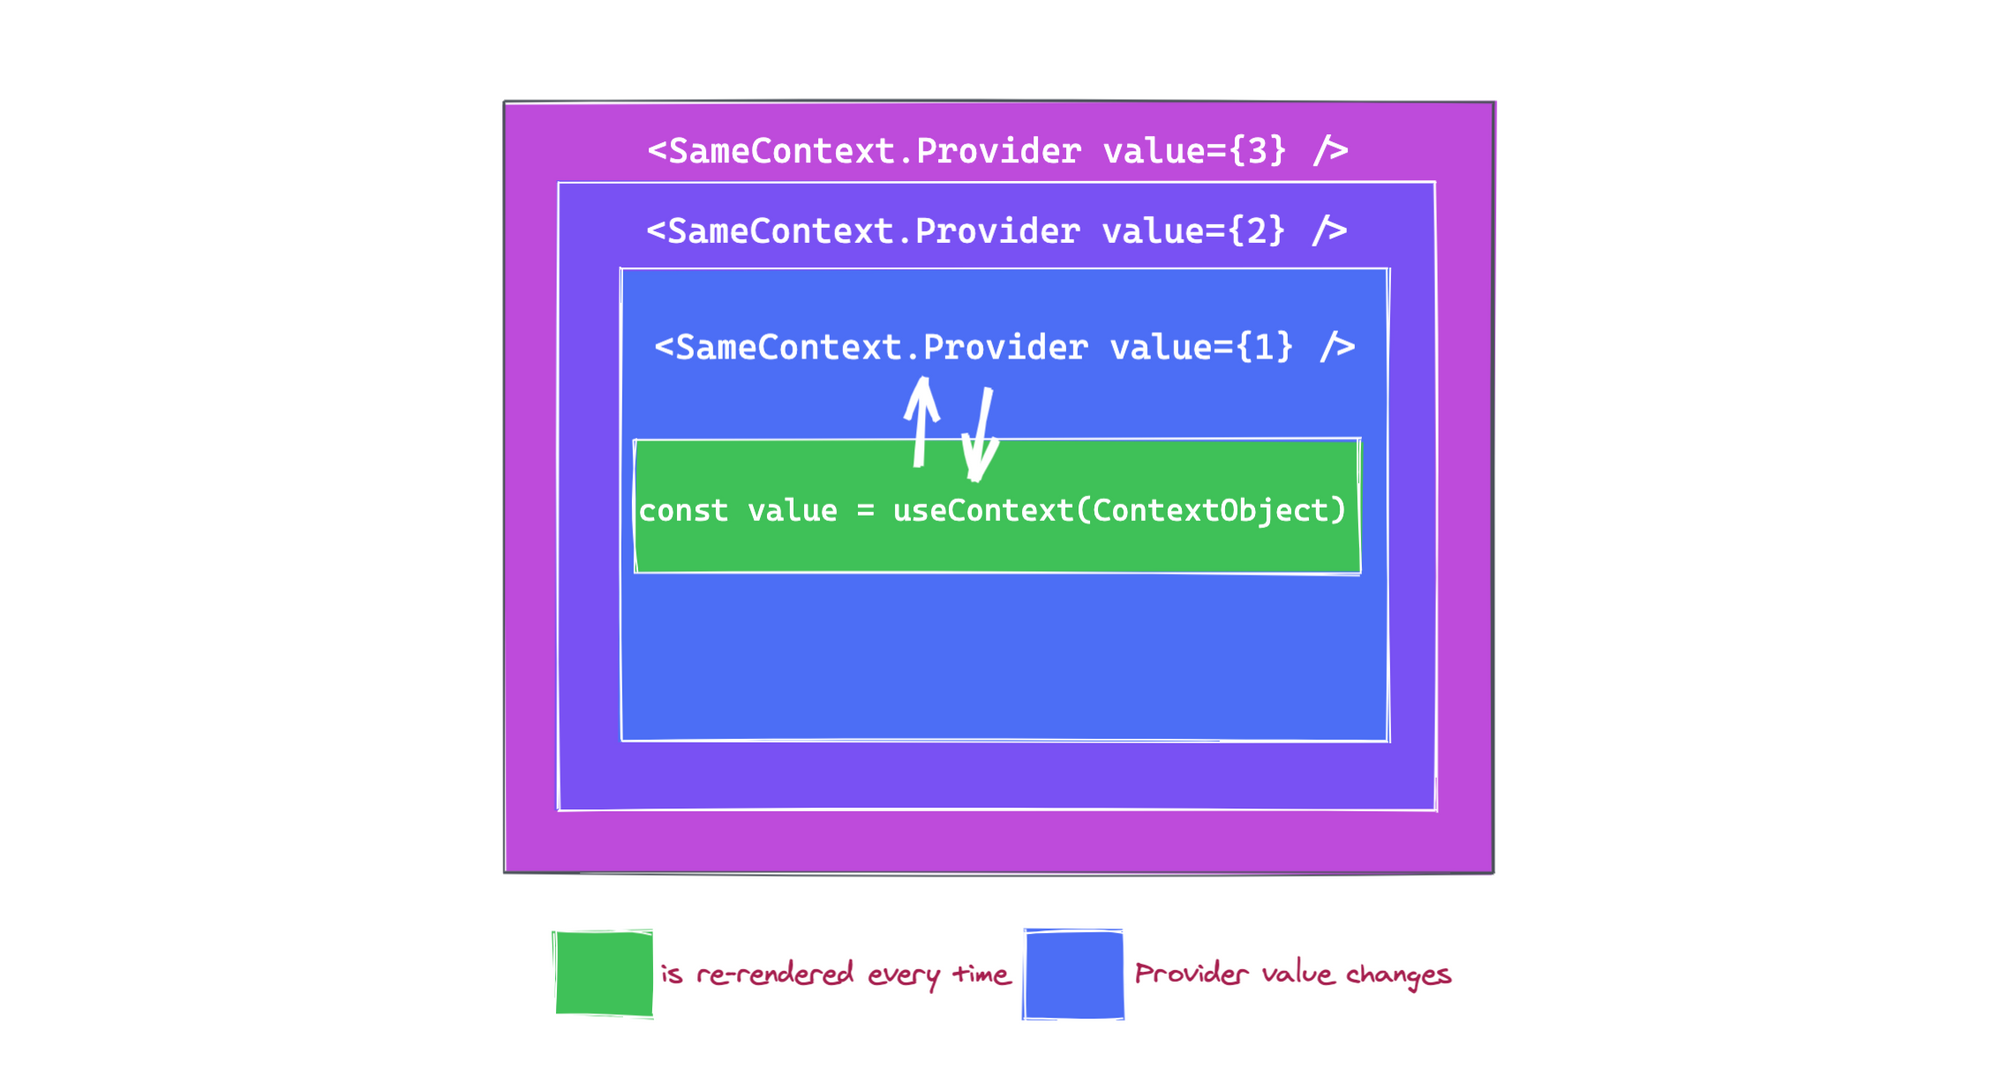
Note that using the useContext hook within a component implicitly subscribes to the nearest Provider in the component tree i.e when the Provider updates, this hook will trigger a serenader with the latest value passed to that Provider.
Here’s an even more important point to remember. If the ancestor component uses React.memo or shouldComponentUpdate, a re-render will still happen starting at the component that calls useContext.
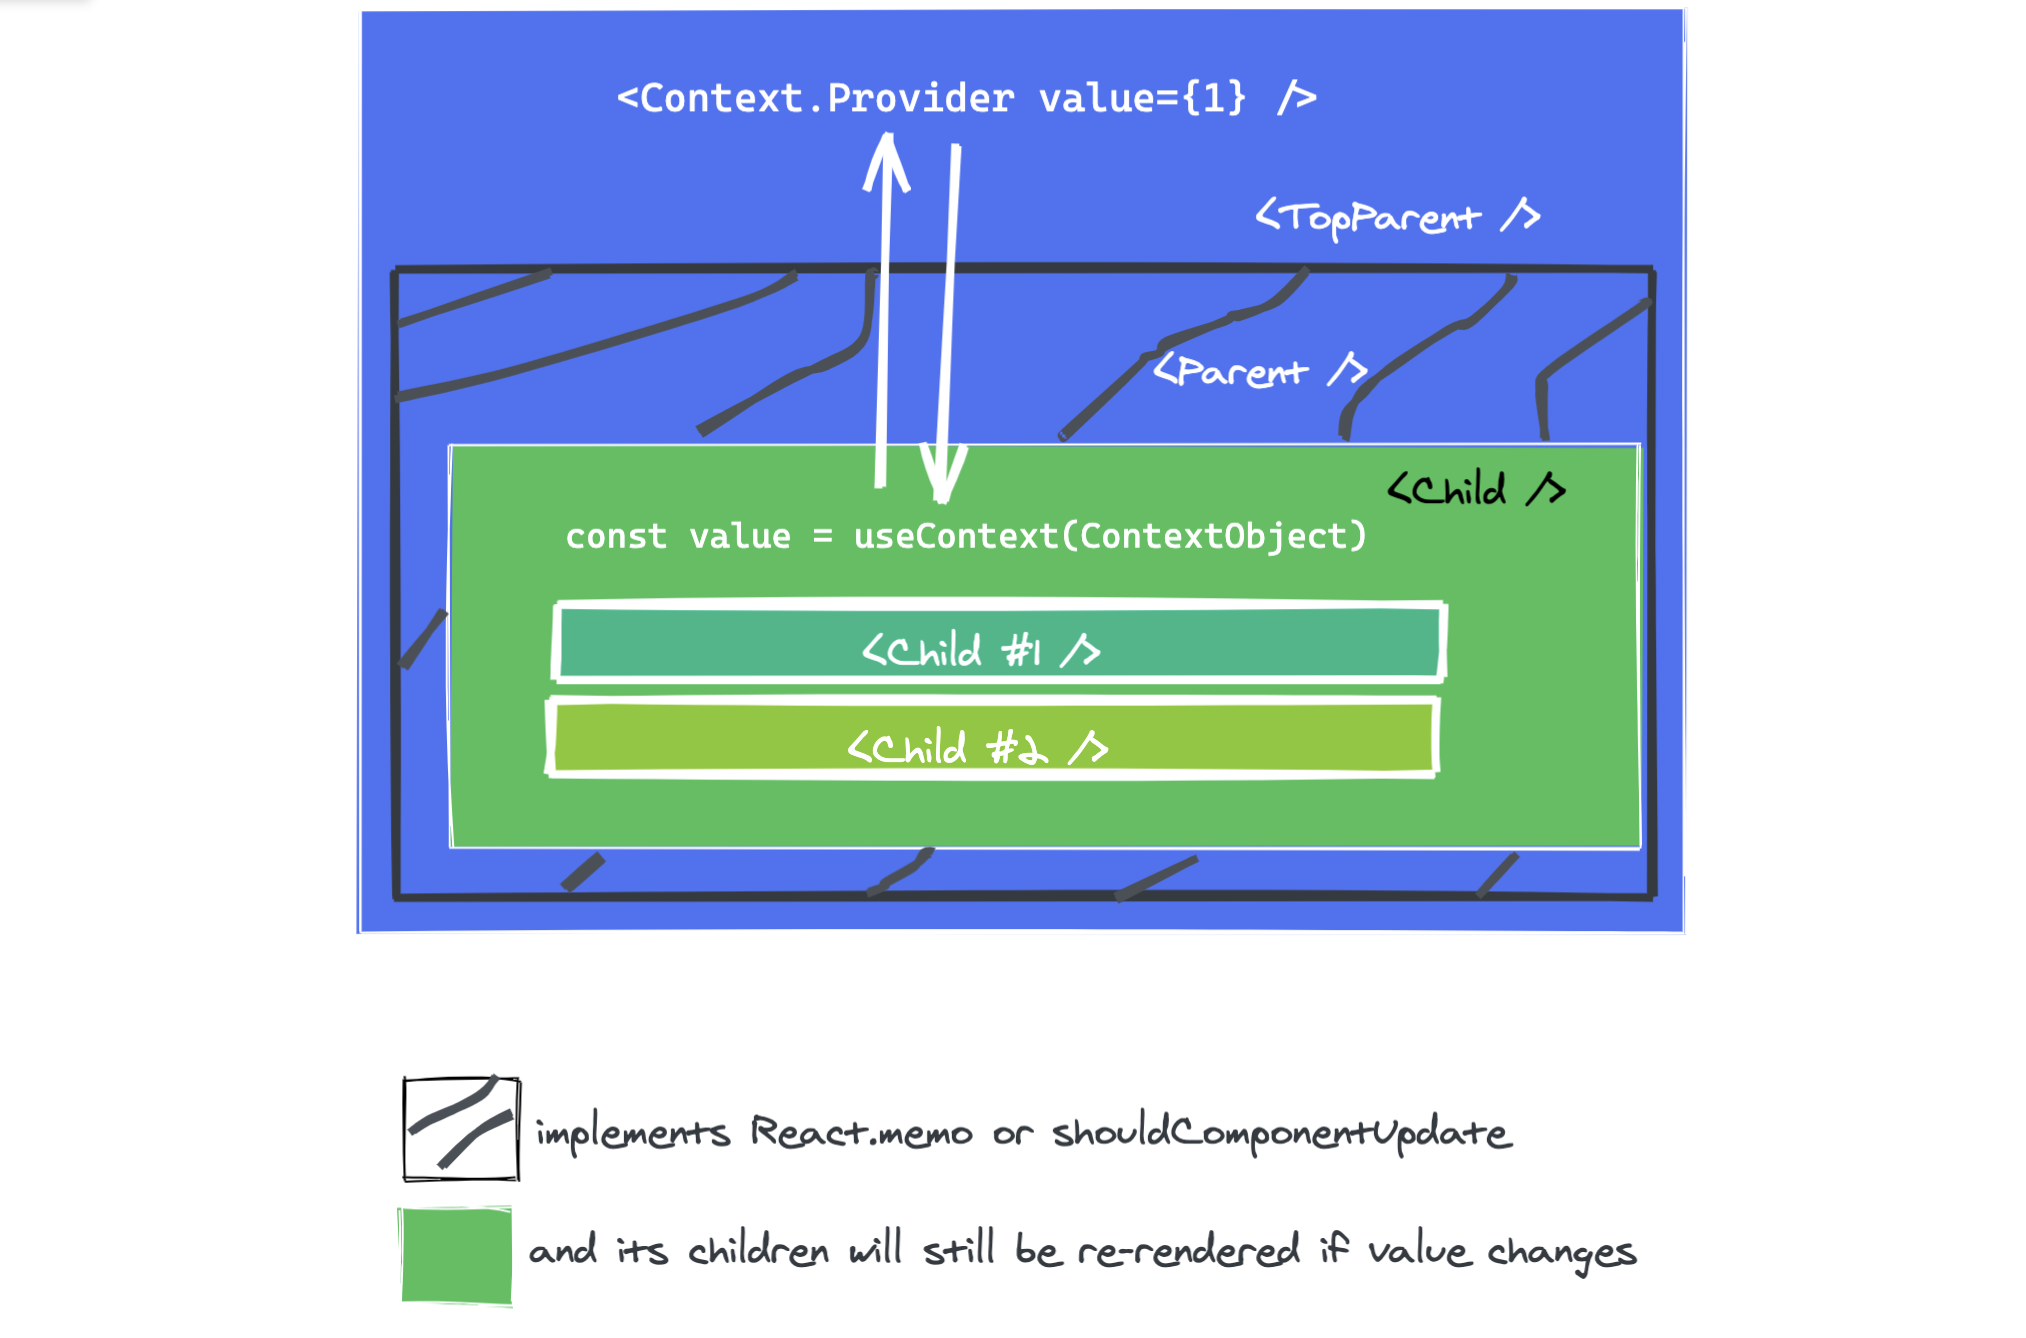
A component calling useContext will be re-rendered when the context value changes. If this is expensive, you may consider optimising it by using memoization.
Remember that useContext only lets you read the context and subscribe to its changes. You still need a context provider i.e ContextObject.Provider above in the component tree to provide the value to be read by useContext
Here’s an example:
const theme = {
  light: {background: "#fff"},
  dark: {background: "#000"}
}

// create context object with light theme as default
const ThemeContext = React.createContext(theme.light)

function App() {
   return (
    // have context provider up the tree (with its value set)
    <ThemeContext.Provider value={theme.dark}>
       <Body />
    </ThemeContext.Provider>
 )
}

function Body() {
  //get theme value. Make sure to pass context object
  const theme = useContext(ThemeContext)
  return (
   {/* style element with theme from context*/}
   <main style={{ background: theme.background, height: "50vh", color: "#fff" }}>
	 I am the main display styled by context!
   </main>
  )
}
Additional Hooks
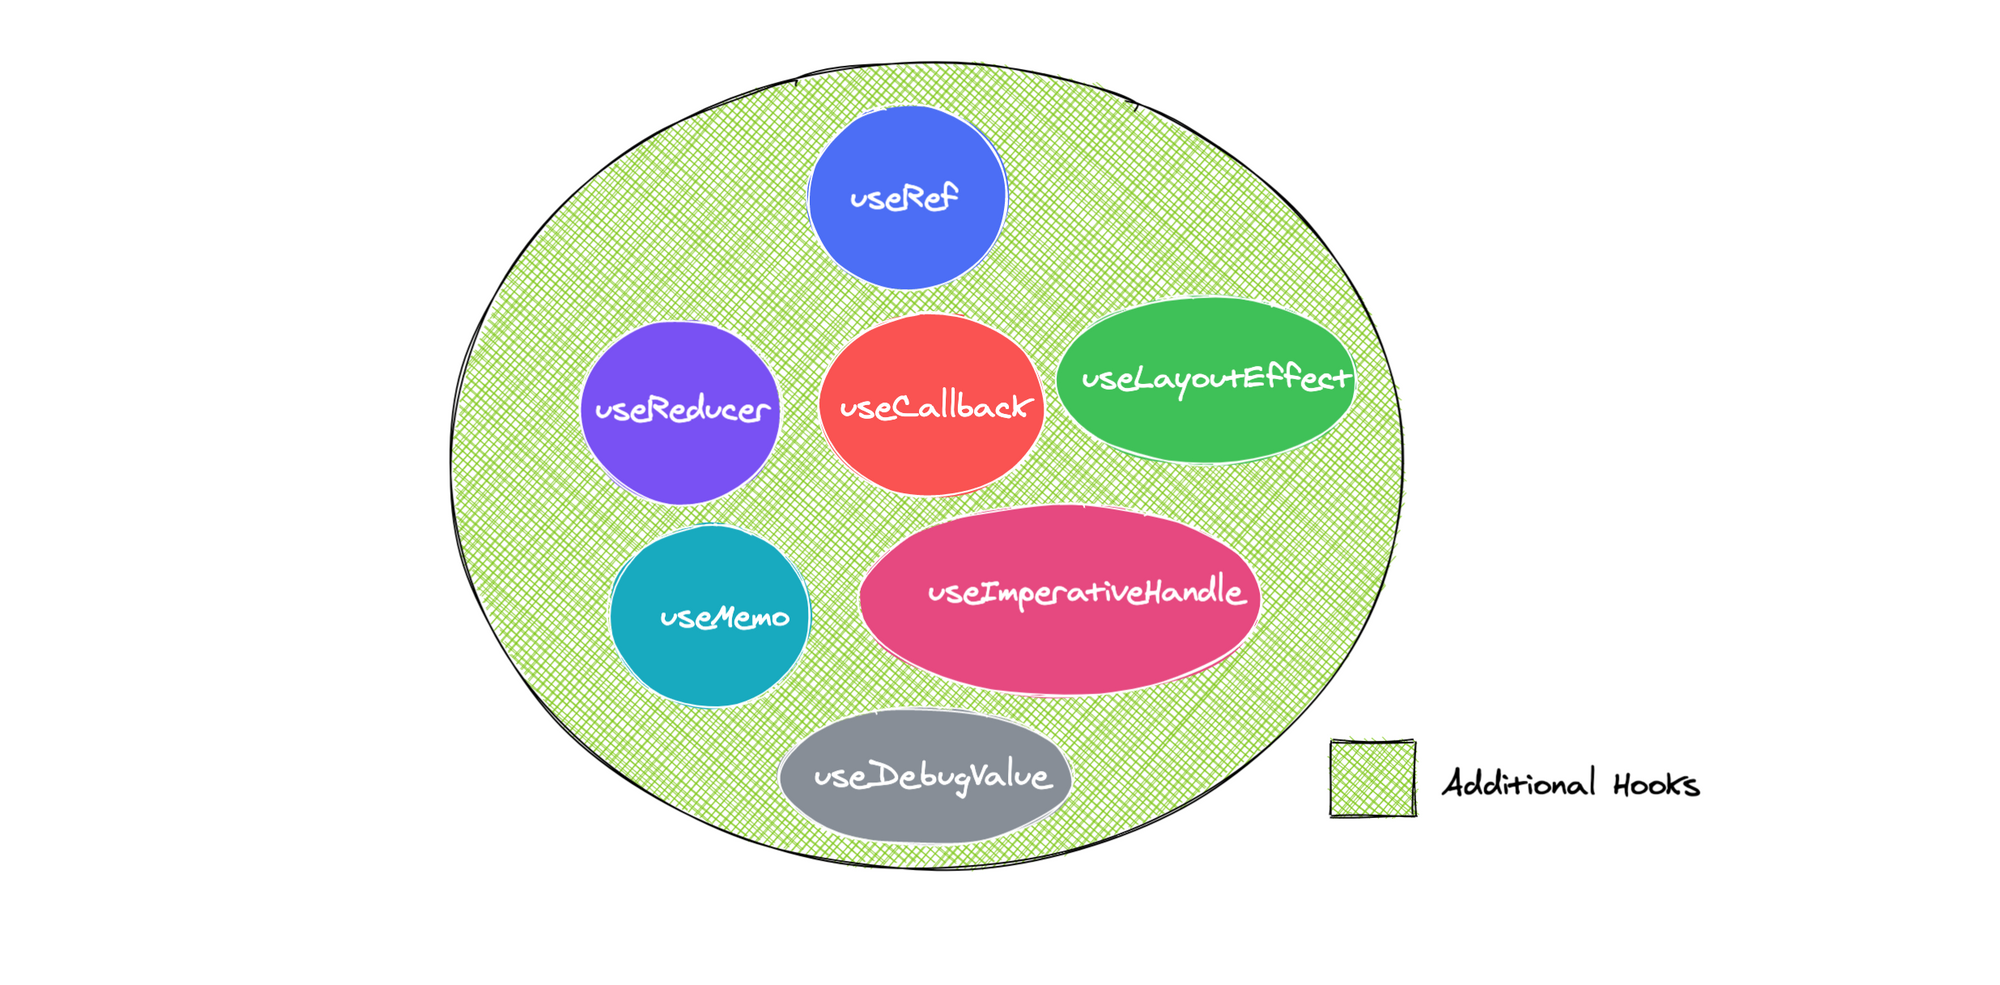
The following hooks are variants of the basic hooks discussed in the sections above. If you’re new to hooks don’t bother learning these right now. They are only needed for specific edge cases.
useReducer
useReducer is an alternative to useState. Here’s how it’s used:
const [state, dispatch] = useReducer(reducer, initialArgument, init)
When invoked, useReducer returns an array that holds the current state value and a dispatch method. If you’re familiar with Redux, you already know how this dispatch works.
With useState you invoke the state updater function to update state; with useReducer you invoke the dispatch function and pass it an action i.e an object with at least a type property:
dispatch({type: 'increase'})
NB: conventionally an action object may also have a payload i.e {action: 'increase', payload: 10}
While it’s not absolutely necessary to pass an action object that follows this pattern, it’s a very common pattern popularised by Redux.
When to use useReducer
When you have complex state logic that utilise multiple sub-values or when state depends on the previous one, you should favour the use of useReducerover useState.
Like the setState updater function returned from calling useState, the dispatch method identity remains the same. So it can be passed down to child components instead of callbacks to update the state value held within useReducer.
The reducer function
useReducer accepts three arguments. The first, reducer is a function of type (state, action) => newState. The reducer function takes in the current state, and an action object and returns a new state value.
This takes some time to get used to except you’re already familiar with the concepts of reducers.
Basically, whenever you attempt to update state managed via useReducer i.e by calling dispatch, the current state value and the action argument passed to dispatch are passed on to the reducer.
//receives current state and dispatched action
const reducer = (state, action) => {

}
It’s your responsibility to then return the new state value from the reducer.
const reducer = (state, action) => {
   // return new state value
   return state * 10
}
A more common approach is to check the type of action being dispatched and act on that:
const reducer = (state, action) => {
   // check action type
   switch (action.type) {
    case "increase":
     //return new state
      return state * 10;
    default:
      return state;
  }
}
Specifying the initial state
If you don’t pass the third argument to useReducer, the second argument to useReducer will be taken as the initialState for the hook.
// two arguments
useReducer(reducer, initialState)

// three arguments
useReducer(reducer, initialArgument, init)
// I exxplain what the init function is in the  Lazy Initialisation section below
Consider the example below:
const [state, dispatch] = useReducer(reducer, 10) // initial state will be 10
If you’re familiar with redux , it’s worth mentioning that the state = initialState convention doesn’t work the same way with useReducer.
// where 10 represents the initial state
// doesn't work the same with useReducer
const reducer = (state = 10, action) {

}
The initialState sometimes needs to depend on props and so is specified from the Hook call instead.
useReducer(state, 10) // where 10 represents the initial state
If you really want the redux style invocation, do this: useReducer(reducer, undefined, reducer). This is possible, but not encouraged.
Example
The following is the growing button example from the useState hook section refactored to use the useReducer hook.
const reducer = (state, action) => {
  switch (action.type) {
    case "increase":
      return state + 10;
    default:
      return state;
  }
};

export default function App() {
  const [width, dispatch] = useReducer(reducer, 50);

  // you update state by calling dispatch
  const increaseWidth = () => dispatch({ type: "increase" });

  return (
    <button style={{ width }} onClick={increaseWidth}>
      I grow
    </button>
  );
}
Lazy Initialisation
You can also create the initial state lazily. To do this, pass a third argument to useReducer - the init function.
const [state, dispatch] = useReducer(reducer, initialArgument, init)
If you pass an init function, the initial state will be set to init(initialState) i.e the function will be invoked with the second argument, initialArgument
This lets you extract the logic for calculating the initial state outside the reducer, and this is maybe handy for resetting the state later in response to an action.
function init(someInitialValue) {
   return { state: someInitialValue }
}


function reducer(state, action) {
   switch(action.type) {
      //reset by calling init function
      case 'reset':
        // an action object typically has a "type" and a "payload"
		return init(action.payload)
   }
}
...
const initialValue = 10;
const [state, dispatch] = useReducer(reducer, initialValue, init)
Bailing out of a dispatch
If you try to update state with the same value as the current state, React won’t render the component children or fire effects e.g. useEffect callbacks. React compares previous and current state via the Object.is comparison algorithm.
it’s important to note that in some cases, React may still render the specific component whose state was updated. That’s okay because React will not go deeper into the tree i.e render the component’s children.
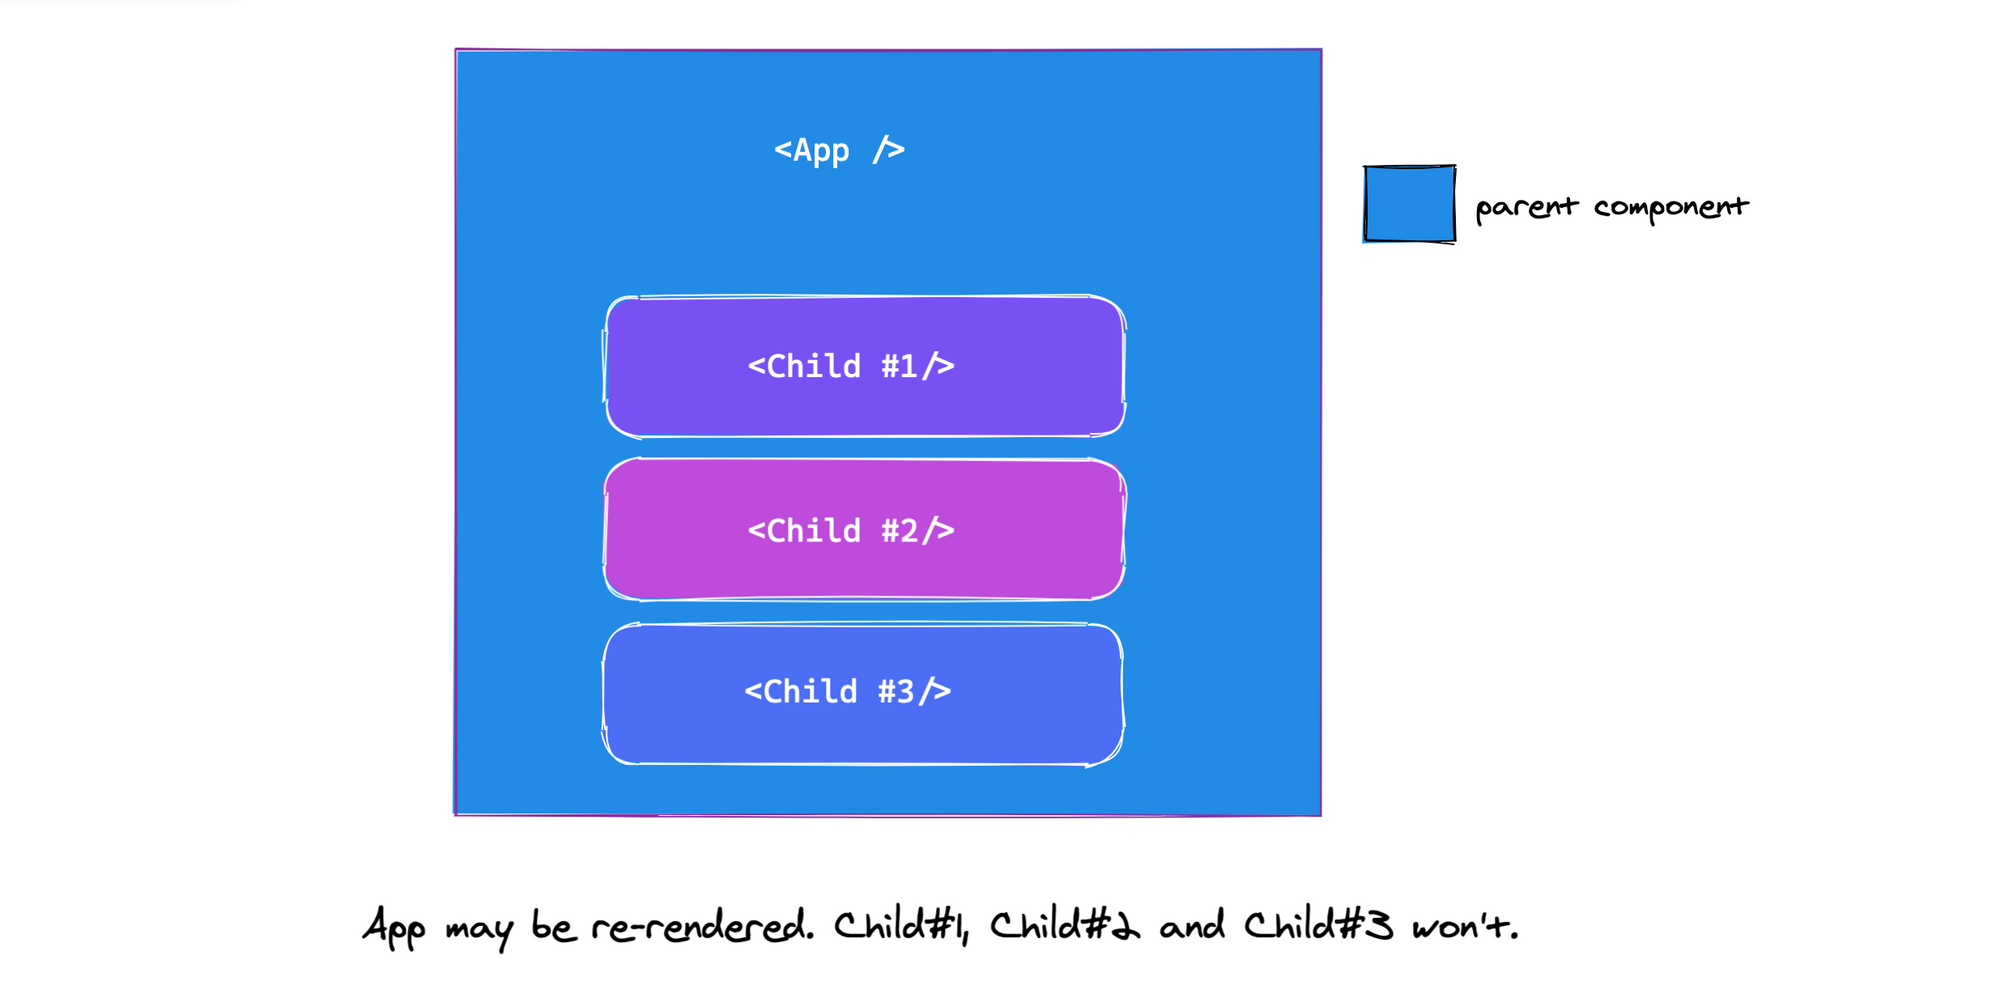
If expensive calculations are done within the body of your functional component, consider optimising these with useMemo
useCallback
The basic signature for useCallback looks like this:
const memoizedCallback = useCallback(callback, arrayDependency)
useCallback takes a callback argument and an array dependency list, and returns a memoized callback.
The memoized callback returned by useCallback is guaranteed to have the same reference and useful when passing callbacks to child components that depend on referential checks to prevent needless re-renders.
The array dependency is equally important. useCallback will recompute the memoized callback if any of the array dependency changes. This is important if you make use of values within the component scope in the callback, and need to keep the values up to date when the callback is invoked.
NB: Be sure to include all referenced variables within the callback in the array dependency. You should also take advantage of the official ESLint plugin to help with checking that your array dependency is correct and providing a fix.
Consider the following example:
const App = () => {
   const handleCallback = () => {
     // do something important
   }
   return <ExpensiveComponent callback={handleCallback}/>
}

const ExpensiveComponent = React.memo(({props}) => {
	// expensive stuff
})
Even though ExpensiveComponent is memoized via React.memo it will still be re-rendered anytime App is re-rendered because the reference to the prop callbackwill change.
To keep the reference to callback the same, we can use the useCallback hook:
const App = () => {
   // use the useCallback hook
   const handleCallback = useCallback(() => {
     // do something important
   })
   return <ExpensiveComponent callback={handleCallback}/>
}
The above solution is incomplete. Without passing an array dependency, useCallback will recompute the returned memoized callback on every render. That’s not ideal. Let’s fix that:
const App = () => {

   const handleCallback = useCallback(() => {
     // do something important
   }, []) // see array dependency

   return <ExpensiveComponent callback={handleCallback}/>
}
Passing an empty array dependency means the memoized callback is only computed once: on mount.
Let’s assume that the callback required access to some props from the App component:
const App = ({props1, props2}) => {
   const handleCallback = useCallback(() => {
     // do something important
     return props1 + props2
   }, [props1, props2]) // see array dependency
   return <ExpensiveComponent callback={handleCallback}/>
}
In such a case, it is important to have props1 and props2 as part of the array dependency list. Except you have good reasons not to do so, you should always do this.
Assuming props1 and props2 are javascript values compared by value and not reference e.g. strings or booleans the example above is straightforward and easy to comprehend.
What if props1 refers to a function?
const App = ({props1, props2}) => {
   const handleCallback = useCallback(() => {
     return props1(props2)
   }, [props1, props2]) // see array dependency
   return <ExpensiveComponent callback={handleCallback}/>
}
By placing props1 , the function as an array dependency, you’ve got to be certain its reference doesn’t change all the time i.e on all re-renders. if it does, then it defies the purpose of using useCallback as the memoized callback returned by useCallback will change every time props1 changes.
There are different ways to deal with such but in a nutshell, you may want to avoid passing such changing callbacks down to child components. props1 could also be memoized using useCallback or avoided altogether.
useMemo
While useCallback returns a memoized callback, useMemo returns a memoized value. That’s a bit of an ambiguous statement since a callback could also be a value. Essentially, useCallback(fn, deps) is equivalent to useMemo(() => fn, deps)
If that’s confusing, consider the basic signature for useMemo :
const memoizedValue = useMemo(callback, arrayDependency);
This looks very similar to the signature for useCallback. The difference here is that the callback for useMemo is a “create” function. It is invoked and a value is returned. The returned value is what’s memoized by useMemo.
Now you may take a second look at the statement made earlier:
useCallback(fn, deps) === useMemo(() => fn, deps)
The statement above is true because useMemo invokes the “create” function () => fn. Remember that arrow functions implicitly return. In this case, invoking the “create” function returns fn . Making it equivalent to the useCallback alternative.
Use useCallback to memoize callbacks and useMemo to memoize values; typically the result of an expensive operation you don’t want to be recomputed on every render:
const memoizedValue = useMemo(() => computeExpensiveValue(a, b), [a, b]);
useMemo can be used as an optimisation to avoid expensive calculations on every render. While this is encouraged it isn’t a semantic guarantee. In the future, React may choose to ignore previously memoized values and recompute them on next render e.g. to free memory for offscreen components.
Your code should work without useMemo, then add useMemo for performance optimisation.
Note that the array dependency for useMemoworks the same as in useCallback:
const App = () => {
  useMemo(() => someExpensiveCalculation())

  return null
}
Without an array dependency as seen above, someExpensiveCalculation will still be run on every re-render.
const App = () => {
  // see array below
  useMemo(() => someExpensiveCalculation(), [])

  return null
}
With an empty array, it only runs on mount.
NB: Be sure to include all referenced variables within the callback in the array dependency. You should also take advantage of the official ESLint plugin to help with checking that your array dependency is correct and providing a fix.
useRef
The basic signature for useRef looks like this:
const refObject = useRef(initialValue)
useRef returns a mutable object whose value is set as: {current: initialValue}.
The difference between using useRef and manually setting an object value directly within your component i.e const myObject = {current: initialValue} is that the ref object remains the same all through the lifetime of the component i.e across re-renders.
const App = () => {
   const refObject = useRef("value")
   //refObject will always be {current: "value"} every time App is rerendered.
}
To update the value stored in the ref object, you go ahead and mutate the current property as follows:
const App = () => {
   const refObject = useRef("value")

   //update ref
   refObject.current = "new value"

  //refObject will always be {current: "new value"}
}
The returned object from invoking useRefwill persist for the full lifetime of the component, regardless of re-renders.
A common use case for useRef is to store child DOM nodes:
function TextInputWithFocusButton() {
  //1. create a ref object with initialValue of null
  const inputEl = useRef(null);

  const onButtonClick = () => {
    // 4. `current` points to the mounted text input element
    // 5. Invoke the imperative focus method from the current property
    inputEl.current.focus();
  };

  return (
    <>
      {/* 2. as soon as input is rendered, the element will be saved in the ref object i.e {current: *dom node*}  */}
      <input ref={inputEl} type="text" />
      {/* 3. clicking the button invokes the onButtonClick handler above */}
      <button onClick={onButtonClick}>Focus the input</button>
    </>
  );
}
The example above works because if you pass a ref object to React e.g. <div ref={myRef} />, React will set its current property to the corresponding DOM node whenever that node changes i.e myRef = {current: *dom node*}
useRef returns a plain javascript object so it can be used for holding more than just DOM nodes. It can hold whatever value you want. This makes it the perfect choice for simulating instance-like variables in functional components:
const App = ({prop1}) => {
    // save props1 in ref object on render
	const initialProp1 = useRef(prop1)

    useEffect(() => {
       // see values logged here
       console.log({
         initialProp1: initialProp1.current,
         prop1
       })
    }, [prop1])
}
In the example above we log initialProp1 and prop1 via useEffect. This will be logged on mount and every time prop1 changes.
Since initialProp1 is prop1 saved on initial render, it never changes. It’ll always be the initial value of props1. Here’s what I mean.
If the first value of props1 passed to App were 2 i.e <App prop1={2} />, the following will be logged on mount:
{
  initialProp1: 2,
  prop1: 2,
}
If prop1 passed to Appwere changed from 2 to 5 say owing to a state update, the following will be logged:
{
  initialProp1: 2, // note how this remains the same
  prop1: 5,
}
initialProp1 remains the same through the lifetime of the component because it is saved in the ref object. The only way to update this value is by mutating the current property of the ref object: initialProp1.current = *new value*
With this, you can go ahead and crate instance like variables that don’t change within your functional component.
Remember, the only difference between useRef() and creating a {current: ...} object yourself is that useRef will give you the same ref object on every render.
There’s one more thing to note. useRef doesn’t notify you when its content changes i.e mutating the current property doesn’t cause a re-render. For cases such as performing a state update after React sets the current property to a DOM node, make use of a callback ref as follows:
function UpdateStateOnSetRef() {
  // set up local state to be updated when ref object is updated
  const [height, setHeight] = useState(0);

  // create an optimised callback via useCallback
  const measuredRef = useCallback(node => {
    // callback passed to "ref" will receieve the DOM node as an argument
    if (node !== null) {
      // check that node isn't empty before calling state
      setHeight(node.getBoundingClientRect().height);
    }
  }, []);

  return (
    <>
      {/* pass callback to the DOM ref */}
      <h1 ref={measuredRef}>Hello, world</h1>
      <h2>The above header is {Math.round(height)}px tall</h2>
    </>
  );
}
useImperativeHandle
The basic signature for the useImperativeHandle is:
useImperativeHandle(ref, createHandle, [arrayDependency])
useImperativeHandle takes a ref object, and a createHandle function whose return value “replaces” the stored value in the ref object.

Note thatuseImperativeHandle should be used with forwardRef. Consider the following example:
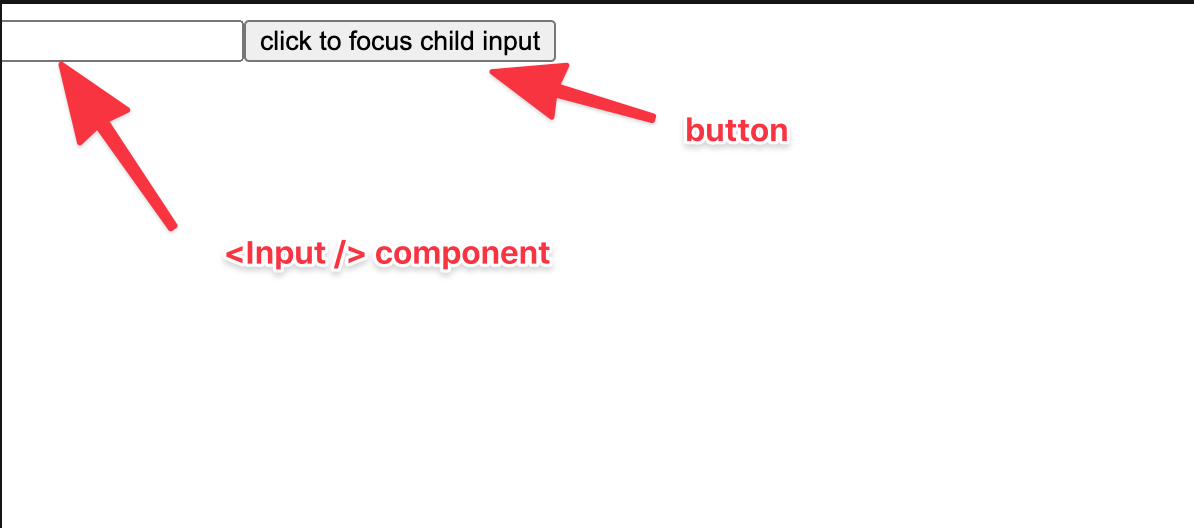
The goal of the application is to focus the input when the button element is clicked. A pretty simple problem.
const App = () => {
  const inputRef = useRef(null);

  const handleClick = () => {
    inputRef.current.focus();
  };

  return (
    <>
      <Input ref={inputRef} />
      <button onClick={handleClick}>click to focus child input</button>
    </>
  );
}
The solution above is correct. We create a ref object and pass that to the Input component. To forward the ref object to the Input child component, we use forwardRef as follows:
const Input = forwardRef((props, ref) => {
  return <input ref={inputRef} {...props} />;
});
This is great, it works as expected.
However, in this solution the parent component App has full access to the input element i.e the inputRef declared in App holds the full DOM node for the child input element.
What if you didn’t want this? What if you want to hide the DOM node from the parent and just expose a focus function, which is basically all the parent needs?
That’s where useImperativeHandle comes in.
Within the Input component we can go ahead and use the useImperativeHandle hook as follows:
const Input = forwardRef((props, ref) => {
  // create internal ref object to hold actual input DOM node
  const inputRef = useRef();

  // pass ref from parent to useImperativeHandle and replace its value with the createHandle function
  useImperativeHandle(ref, () => ({
    focus: () => {
      inputRef.current.focus();
    }
  }));

  // pass internal ref to input to hold DOM node
  return <input ref={inputRef} {...props} />;
});
Consider the useImperativeHandle invocation:
useImperativeHandle(ref, () => ({
    focus: () => {
      inputRef.current.focus();
    }
  }));
The function argument returns an object. This object return value is set as the current property for the ref passed in from the parent.
Instead of the parent having full access to the entire DOM node, the inputRef in App will now hold {current: focus: ..}. Where focus represents the function we defined within useImperativeHadle
If you went ahead to log the ref objects in the parent component App and child component Input this becomes even more apparent:
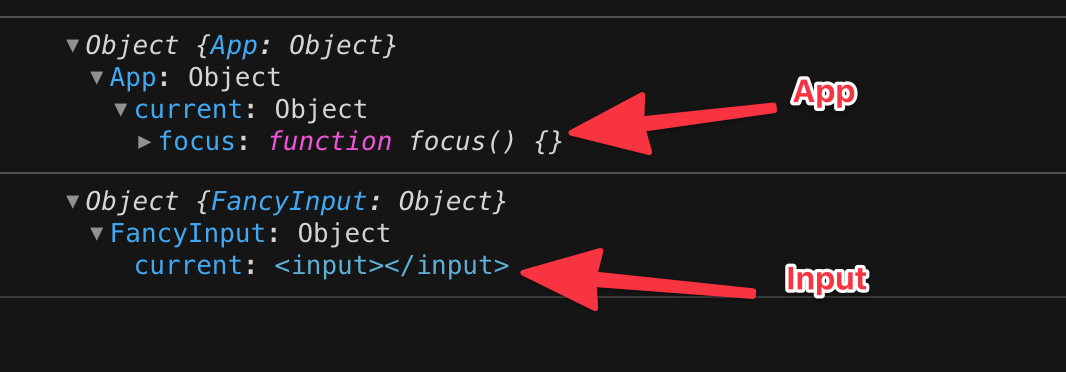
Now you know how useImperativeHandle works! It’s a way to customise the instance value that is exposed to parent components when using ref. A very specific use case.
If you need control over the re-computation of the value returned from the function argument to useImperativeHanndle, be sure to take advantage of the array dependency list.
useLayoutEffect
The signature for useLayoutEffectis identical to useEffect. The difference is the time of execution.
Your useLayoutEffect callback/effects will be fires synchronously after all DOM mutations i.e before the browser has a chance to paint.
It is recommended you use useEffect when possible to avoid blocking visual updates, however, there are legitimate use cases for useLayoutEffect e.g.to read layout from the DOM and synchronously re-render.
If you are migrating code from a class component, useLayoutEffect fires in the same phase as componentDidMount and componentDidUpdate but start with useEffect first and only try useLayoutEffect if that causes a problem. Don’t block visual updates except you’re absolutely sure you need to.
It’s also worth mentioning that with server-side rendering, neither useEffect or useLayoutEffect are run until Javascript is downloaded on the client.
You’ll get a warning with server-rendered components containing useLayoutEffect. To resolve this, you can either move the code to useEffect i.e to be fired after first render (and paint) or delay showing the component until after the client renders.
To exclude a component that needs layout effects from the server-rendered HTML, render it conditionally with showChild && <Child /> and defer showing it with useEffect(() => { setShowChild(true); }, []). This way, the UI doesn’t appear broken before hydration.
useDebugValue
The basic signature for useDebugValue is as follows:
useDebugValue(value)
useDebugValue can be used to display a label for custom hooks in React DevTools.
Consider the following basic custom hook:
const useAwake = () => {
  const [state, setState] = useState(false);

  const toggleState = () => setState((v) => !v);

  return [state, toggleState];
};
A glorified toggle hook. Let’s go ahead and use this custom hook:
export default function App() {
  const [isAwake, toggleAwake] = useAwake();

  return (
    <div className="App">
      <h1>isAwake: {isAwake.toString()} </h1>
      <button onClick={toggleAwake}>Toggle awake!</button>
    </div>
  );
}
Here’s the result of that:

Consider how the React devtools displays this:

Every custom hook within your app is displayed in the devtools. You can click on each hook to view its internal state:
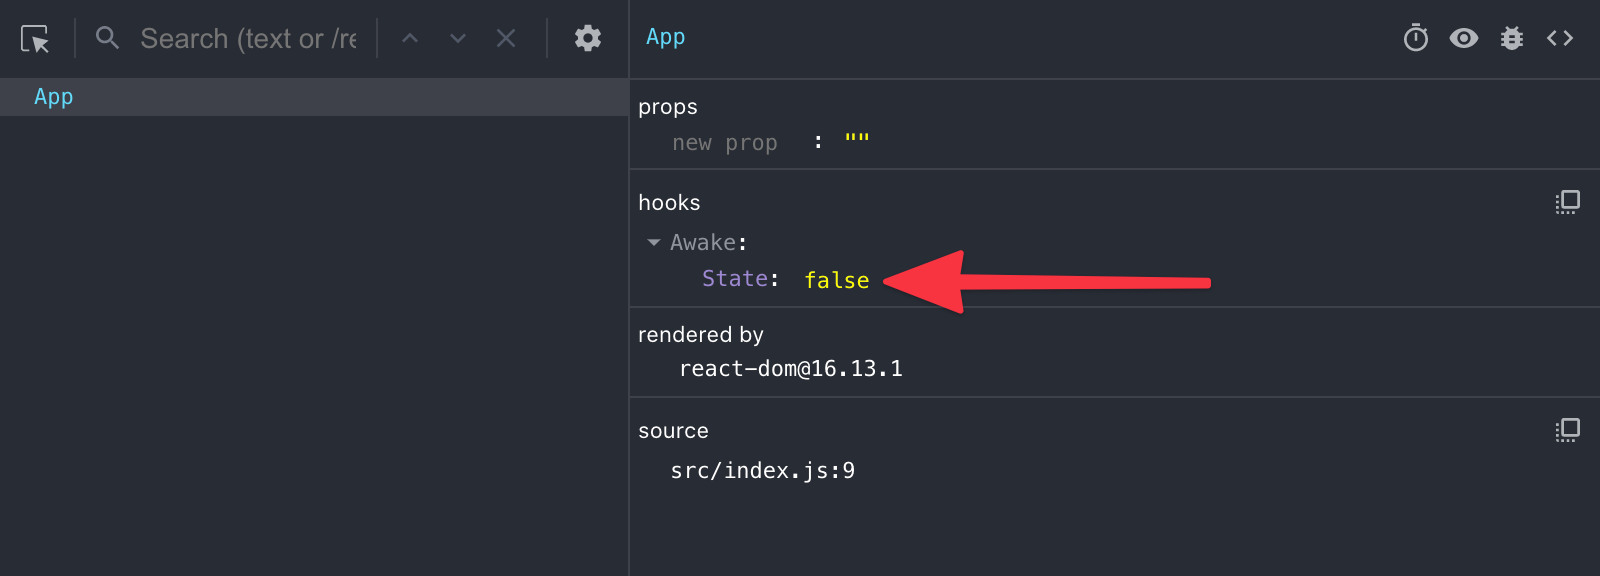
If you want to display a custom “label” in the devtools, we can use the useDebugValue hook as follows:
const useAwake = () => {
  const [state, setState] = useState(false);
  // look here
  useDebugValue(state ? "Awake" : "Not awake");
  ...
};
The custom label will now be displayed in the devtools as seen below:
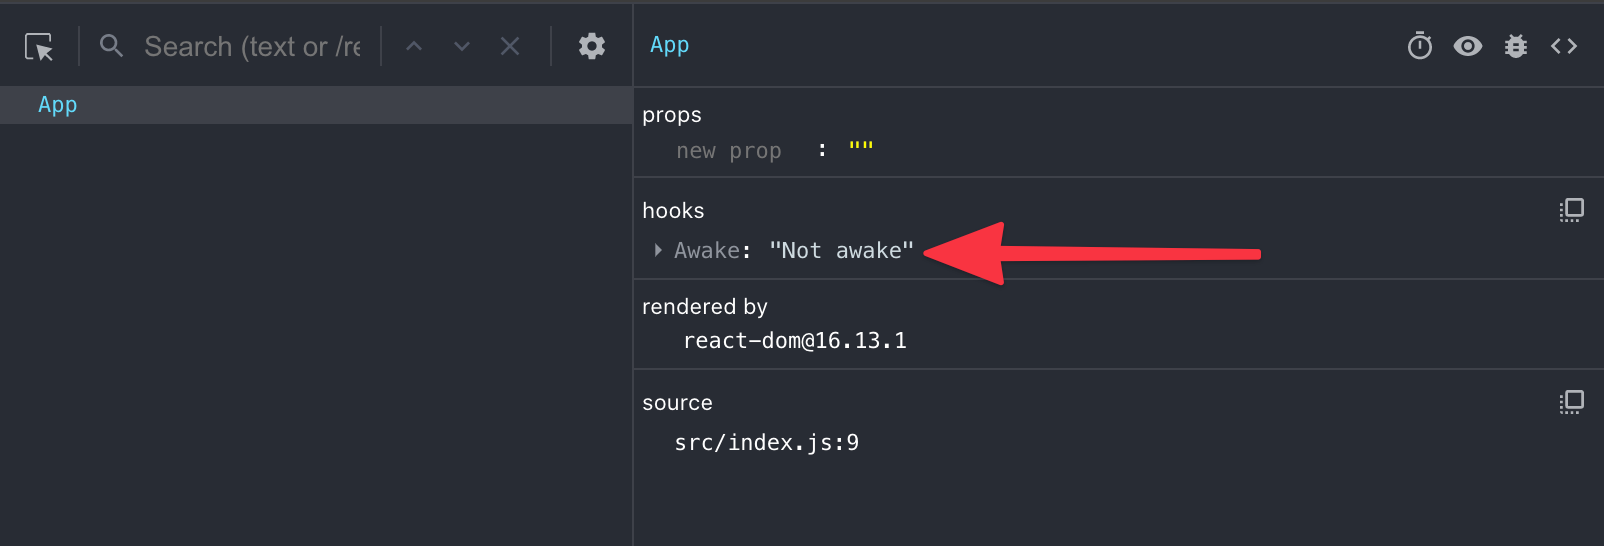
NB: Don’t add debug values to every custom Hook. It’s most valuable for custom Hooks that are part of shared libraries.
In some cases, formatting a value for display via useDebugValue might be an expensive operation. It’s also unnecessary to run this expensive operation unless a Hook is actually inspected. For such cases, you can pass a function to useDebugValue as a second argument.
useDebugValue(state ? "Awake" : "Not awake", val => val.toUpperCase());
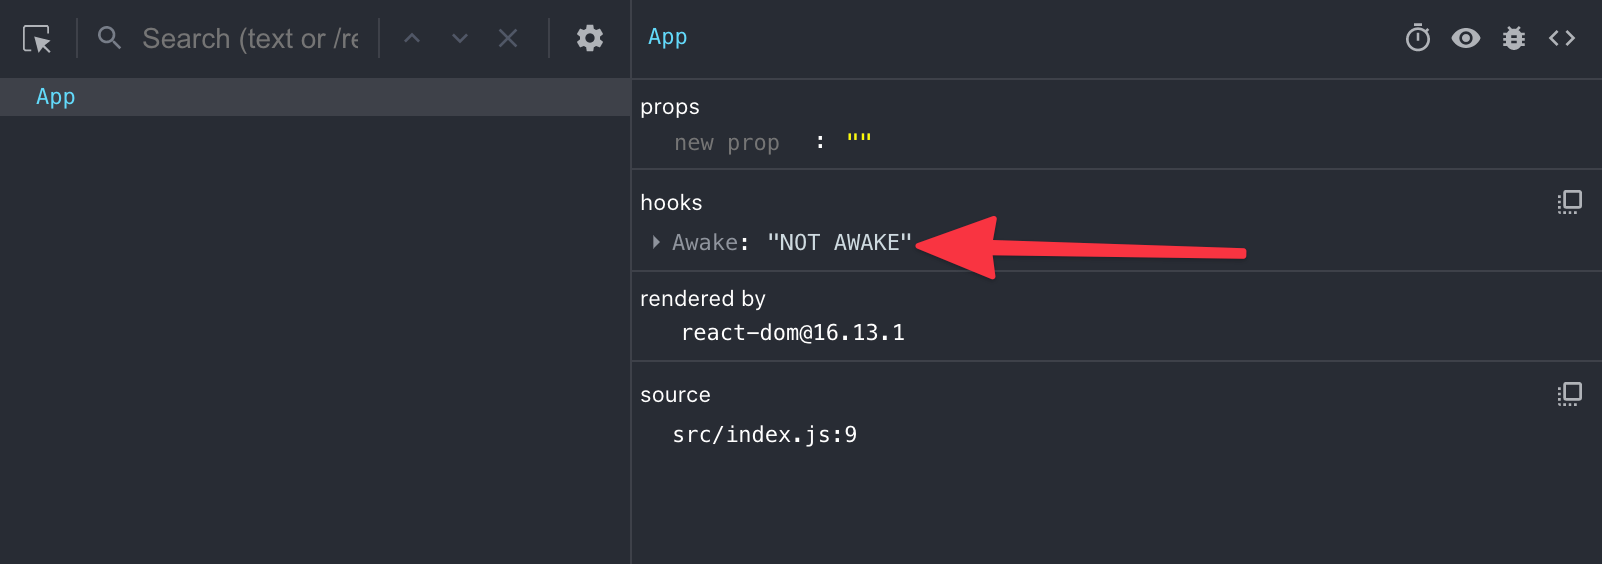
In the example above we avoid calling val.toUpperCase unnecessarily as it’ll only be invoked if the hook is inspected in the React devtools.
Conclusion
I hope this reference guide helps you understand the basic, advanced and lesser-known hooks. Go apply your knowledge of hooks and build more interesting applications!
